
LineWars VR Blog Posts
Oct 31st, 2020 - LineWars VR One Year Anniversary!
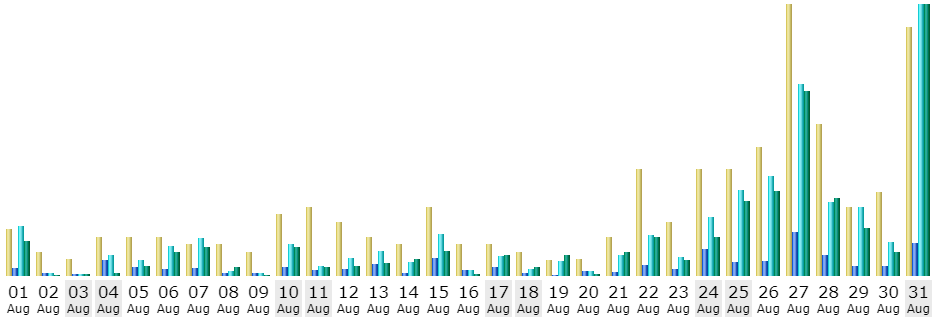
Happy Halloween! Today is the one year anniversary of the release of LineWars VR! A big thank you to all of you who have purchased the game, and especially to those of you who have taken the time to write a review! The reviews of the game are very encouraging to read, as most of you feel the game is the best space shooter on the Oculus Go platform. That was pretty much my goal when creating the game, so it is very nice to see I was able to reach that goal!
Here below are some of the latest statistics abot the game. It is nice to see, that even a year after the release, people are still playing the game! I also still get an occasional sale every now and then, which is very nice. The game was not a big sales hit, which is not surprising, with it being a bit of a niche genre on a niche platform. I didn't make the game to make money, so that is not much of a dissappointment. Thanks again for your interest!
Dec 22nd, 2019 - LineWars VR Will Be Included in the Oculus Holiday Sale 2019!
LineWars VR will take part in the upcoming Oculus Holiday Sale 2019 (from 25th to 30th of December)! LineWars VR will be 50% off during that time, so if you have been thinking about purchasing the game, but haven't taken the plunge yet, that would be the perfect time! Check the game out at https://www.oculus.com/experiences/go/1641698295876186 (for Oculus Go, or at https://www.oculus.com/experiences/gear-vr/1641698295876186 if you prefer Gear VR)!
Big thanks to all of you who have already purchased the game, and especially to those who have been kind enough to leave a 5-star review. Much appreciated, thank you! Have a Merry Christmas and a Happy New Year everyone!
Nov 10th, 2019 - LineWars VR Original Soundtrack Is Available!
The composer who made the original music for each of my missions has put the actual tracks available on Pond5 (he goes by the name Audiomorphia there, even though he uses the name Agroglyph on Audiojungle). Feel free to check out the soundtrack!
In other news, I just created the web site for my next game project, Air Battle of Midway! The site does not have much information yet, as the game is in the early development/planning stages, but I hope to continue my habit of writing blog posts at least once a month, or more frequently if something interesting happens.
LineWars VR has not had huge sales numbers yet, but I suppose that is to be expected, with not much of an advertisement campaign. Also it seems like Gear VR is getting to be a somewhat obsolete device (looks like practically all the sales have been for Oculus Go). I am happy that it has gotten quite good reviews, though! Feel free to spread the word!
Oct 31st, 2019 - LineWars VR Is Now Available!
LineWars VR has been released! Get the game from here: https://www.oculus.com/experiences/go/1641698295876186
At the same time it got released, the first YouTube review of the game, by Go Bros, got published:
I hope you all enjoy the game!
Oct 30th, 2019 - LineWars VR Has a Release Date (Oct 31st, 2019)!
I just this morning got an email from Oculus store staff:
Congratulations! Your app has been approved to be published in the Oculus Store!

Your app is set to be published on October 31st, 2019 @ 10AM Pacific Time for $5.99 under the Games section of the Mobile store.
Wow, suddenly things are very real! And, the release date is imminent, it is tomorrow! Not a lot of time to start a marketing campaign, perhaps I should have thought of that earlier... Well, too late now.
Oct 20th, 2019 - LineWars VR is Ready for Release!
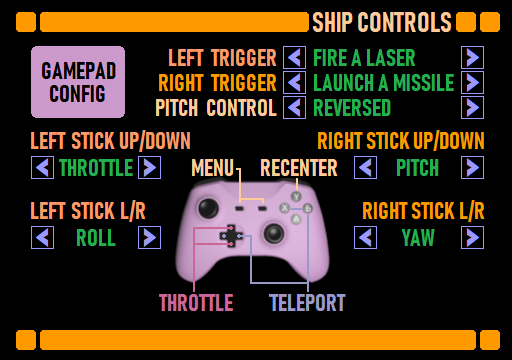
Gamepad Support Improvements
After I published my previous blog post, I continued working on the items on my TODO list. One of them was finalizing the Gamepad support in my game. I have already for a long time had basic support for gamepads, and in fact I test my game when in Unity Editor using the gamepad support code, with my Saitek X52 Flight stick emulating a gamepad. However, I had not implemented any functionality for the D-Pad nor the A,B,X,Y buttons of most gamepads. I decided to implement these, so that I can then finish up my gamepad control legend graphics as well. I also added code to handle the Select/Start/Menu buttons, all of which should do the same thing as the Back button in the 3DOF Controller.
The steering using the gamepad has always felt awkward to me (as it does in any other game as well, not just in LineWars VR), so I also tried to add some proportionality to the steering speed. After a lot of testing, it seemed like raising the -1..1 range of the stick to the third power gave the best curve, with reasonable accuracy in the middle, yet fast enough rotation so you can actually tail the enemy ships. Using the 3DOF controller rotation can naturally use the exact rotation of the controller to steer the ship, so this has always been much more accurate and natural way to control the ships.
Anyways, I made the D-Pad left/right cause teleporting, and up/down to affect throttle. The horizontal X and B buttons also do the teleporting, while the Y button on the gamepad centers view. The A button fires a laser, as I could not think of what else it should do. The stick functionality is configurable, so you can adjust them to your liking.
Texture Work
A major area that still needed much work was the texturing on many of the game objects. I made the following texture improvements to various objects:
- The exploded cruiser parts had some missing textures in the areas where the cruiser has broken into the two halves. As I had to manually adjust the texturing for every body panel of those exploded parts, this was such a chore that I had gotten bored with working on that when I originally did the exploded cruiser parts. Now I just had to go through the remaining polygons, and figure out what would be the most suitable texture section to have on them, whether it would be an animated fire texture or a plain damaged structure section. It did not actually take me all that long to fix these, just a couple of hours.
- The Alien mothership lacked texturing for the drone launch tube inside walls, and for the main weapon (stinger) face. I made the launch tube be black on the inside, and the main weapon face got a luminous blinking red color. I managed to do this work the same day I did the exploded cruiser parts.
- Next, I worked on the Cobra cockpit. It had many issues, for example the following:
- The seat backs and bottoms had invalid texture coordinates. I fixed these areas to be plain gray.
- I had never liked the look of the round air vents, so I replaced them with angular vents, much like I have on the Station Bridge ceiling, but obviously much smaller.
- The black background of the analog gauges on the far-right side of the cockpit had a wrong shape, so I fixed them to be either round or properly rectangular as needed.
- I spent a couple of days adding rivets (or small screws) on the edges of the side wall panels, as the plain gray wall panels looked quite boring compared to the very detailed switch panels.
- I also added yellow/black striping on the door frame.
- My TODO list has a note that the rear of the cockpit should have a fire extinguisher and stuff like that, but I decided against adding them since the cockpit already has around 10 000 vertices.
- The Pirate cockpit also needed work. The biggest issue with it was that the rear of the Pirate ship (which is visible when you look back, as the ship has a bubble canopy) did not have proper texturing. I added a texture for this into my cockpit texture atlas (which is getting to be pretty crowded!), and fixed the rear of the ship to use these texture coordinates. The rear part shadow configuration is still not quite correct, but this is not something that you have time to notice in the heat of a battle!
- Finally, the Alien Drones in Mission 9 had been shiny black balls. However, since black is not very visible against the blackness of space, those had been hard to see, in addition to them being hard to hit even if you saw them. Thus, I decided to at least make them more visible. I made them have orange luminous stripes, so you can at least see them, even if hitting them is still hard.
Also the Cruiser Bridge would need a lot of texture work (and also modeling work) on the rear part, as it does not even have a door at the moment! However, after spending a week or so just doing texture work, I thought it was time to move on to some other stuff on my TODO list.
Improved Fade In / Fade Out
As Oculus recommends that scene transitions happen only when the screen is black, I had been using a screen fade script I found from Unity VR Samples called VRCameraFade.cs to fade the screen when launching a mission. I had never much liked that script, especially because it needs an additional Image GameObject head-locked to the camera to cover the screen while the screen is fading. It also uses some audio mixer snapshots to fade audio, but I never got those to work (most likely because I don't use any audio mixers in my game). I had not bothered to add those extra Image objects to all my missions, as I had always thought there needs to be a better way to handle screen fading.
One day I was again reading the Oculus Start Discord channel, and a member nicknamed GEMISIS showed a ScreenFade.cs script he had developed, which seemed much simpler. I decided to switch to using his script, and also finally handle the audio fading in and out as well. The main idea in his script is to use the MonoBehaviour.OnPostRender() method in a script attached to a camera to perform the fading. This method is called after the full scene has been rendered, so it is a good place to add fading. This does not need any extra GameObjects, and the script itself has a Boolean isFading to make the script take practically no time when the screen is not actually fading at the moment.
The only thing that the script needs to work is to have it attached to a camera. As I already had 9 single player missions and 9 multiplayer missions, plus the main menu and the loading scene, I did not want to add this script to all the 20 scenes by hand. Instead, as I already have a current camera reference in my static Movement class, I decided to add the script to a camera only when a fade begins. Thus, my Fade.StartFadeIn() method looks like this:
private static Material fadeMaterial = null;

public static void StartFadeIn()
{
    if (fadeMaterial == null)
        fadeMaterial = new Material(Shader.Find("Oculus/Unlit Transparent Color"));
    Fade fade = Movement.camera.GetComponent<Fade>();
    if (fade == null)
    {
        Movement.camera.AddComponent<Fade>();
        fade = Movement.camera.GetComponent<Fade>();
    }
    if (fade != null)
        fade.StartCoroutine(fade.FadeIn());
}
In that method I first check to see if the fade material has been created. If not, I create a material using the "Unlit Transparent Color" shader, which seems to always be included in a build. Then I check if the current camera already has this Fade script attached. If not, I attach the Fade script to the current camera, and try to get the script instance handle again. If everything is OK and we have a Fade script instance handle, we can start the FadeIn coroutine. Thus, this method is quite self-contained and "just works".
To handle audio fading out, I call some new methods in my GameAudio static class to set up the volume of each audio source to a level proportionate to the current fading status, same as the material alpha channel level is set in the original script. This made me finally have a nice fade in and fade out effect in all my missions and also in the main menu scene.
New Oculus Store Assets
By the middle of September, I had started figuring out what kind of a store cover image I would want for LineWars VR. I spent a couple of days working on an image (with my very poor image editing skills), and then showed that on the Oculus Start Discord channel, asking for feedback. The feedback I got was quite constructive and not particularly harsh, but it made me realize I do not understand what makes a good cover image. I had gotten somewhat frustrated with this, but then suddenly Justin O'Heir (of Art Gate VR) showed a quick sketch of his idea for a cover art for LineWars VR, which was so impressive I immediately contacted him and asked if he would be willing to create the actual cover image. Luckily, he was willing to do this, so this problem got solved with his kind help!

As it happened, he also uses Cinema 4D for his 3D work, so it was easy for me to send him my ship models, so he could use those as the basis for the image. I wanted to have the distinct Cobra and Pirate ship shapes in the cover image, even though those models are very low-poly. I am very happy with the end result, so thanks again Justin!
Mission 5 and 6 Abandoned Starbase Work
Missions 5 and 6 in the game happen around an abandoned starbase. An abandoned starbase should look like it is in a poorly upkept state, been allowed to accumulate damage without anyone bothering to repair anything. I had already set a part of the station ring to be damaged (or perhaps still under construction), but I decided to also add some randomly damaged armor panels around the base, and also make the pole leading to the damaged section of the ring not have any lights in the windows.
The randomly damaged panels meant I had to add some code into my StationImport method. Since the great majority of the station armor panels are actually quads consisting of two triangles, I needed to add this code after I had generated the hitList data structure, which keeps track of each vertex whose UV coordinates need to be updated whenever a triangle gets hit. The new code goes through all the triangles of the station, and randomly (with a low probability) changes the UV coordinates to be an already damaged panel, if the hitList contains 4 vertices for this triangle. This adjusted UV coordinate list is then saved as a resource, so that the missions 5 and 6 can load this UV coordinate array from the resources and adjust the station UV coordinates appropriately.
Mission 8 Skybox
I only had one skybox missing from my game, the skybox for mission 8. I had been thinking about various ideas for a skybox for this mission, but had not yet managed to decide what I want for it. Now it was getting to be high time to decide on it, so I started by figuring out whether the background should contain a blue or red nebula. I noticed that I had a red background in missions 1, 2 and 7, while all the rest (except mission 9, which happens around Earth) have blue nebula background. So, mission 8 should have red nebula background, for balance. But what should be the main feature (planet or something like that) of that skybox?
When thinking about the story of mission 8, I realized that it could actually happen in deep space, and not around any planet. I already had a red nebula background without any planets for mission 2, and I decided to use this same background for mission 8 as well. No need to create a specific skybox for it if there is no need for such, that saves both my work and space in the final executable. Now all my missions had their skyboxes done!
All Menu Videos Done
After I got the damaged station textures done for missions 5 and 6, and decided on the Mission 8 skybox, I now had all the missions looking the way I wanted. Thus, I was finally able to record all the missing video clips for the main menu. The main menu runs a short (32-frame) clip of each mission by the mission name (much like some DVDs do in their chapter menu), just to make the menu a bit more interesting. The videos run at 8 frames per second, with interpolated frames in between, so those 32 frames are actually enough for a 4-second video clip. In an attempt to hide the short length of the videos, I started each video at a different time, so it is not so immediately obvious how they loop the same 32 frames over and over.
In the animated GIF image below the frames are not interpolated, so the animation is not as smooth as it is in the game.
Virtual Reality Check (VRC) Implementation
After I added all the mission video clips to the main menu, I again checked my TODO list. Looking at the list, I realized all my remaining items on the TODO list contained the words "should" or "could", meaning there remained no absolutely necessary items! I thought it might now be a good time to try to get my game approved for the Oculus Store, as I could then work on the remaining non-essential improvements while the review process was underway. The first step was to check whether I had implemented all Mobile Virtual Reality Check (VRC) Guidelines.
VRC.Mobile.Functional.9 states that the app should not submit frames or accept input when the user removes the headset or opens Oculus Dash. I had not handled that event at all, so I suspected I needed to do something to this. My googling about the issue let me know that I need to handle HMDUnmounted and HMDMounted events of the OVRManager class. I added the event handlers to my abstract scene base class (so it automatically affects all scenes in my game), and set Time.timeScale to zero when the HMD is unmounted, and back to one when it gets remounted. I also noticed I did not re-center the HMD when it gets remounted, as stated by VRC.Mobile.Functional.6, so I implemented that to the same HMDMounted event handler. Two birds with one stone!
I also had no functionality for the Back button when in the main menu, although VRC.Mobile.Input.3 states it needs to pause the game and ask whether the player wishes to exit the game. I noticed OVRManager has a nice helper method PlatformUIConfirmQuit(); which does exactly this pausing and quit confirming, so I called that when the player presses Back while in the main menu. I did not find any other omissions from the VRC guidelines, so I thought my game might be ready for Store Review!
Store Submission Technical Review Failures
The next morning, I decided to take the leap and upload LineWars VR for the store review! This was a bit scary, but a necessary step to eventually get the game on the store. The following morning I got the results of the Technical Review, which is the first step of the approval process. This step checks all those VRCs I had just worked on. I got three failures:
- VRC.Mobile.Asset.5 "Screenshots must be representative of the app and don�t contain any additional logos, text, or iconography."
- VRC.Mobile.Input.1 "If the app cannot be used without an external input device (e.g. gamepad or 3DOF controller), and no input device is detected when the app starts up, the app must warn the user to connect the necessary device."
- VRC.Mobile.Security.2 "The app must request the minimum number of permissions required to function."
The Input one was pretty clear; I had forgotten to add a warning if the player has no input device connected. The other two were a bit surprising. The screenshots were the exact ones I have on the main LineWars VR page here, and the security warning was about RECORD_AUDIO, which I obviously need for VoIP to function! I added the audio message my narrator had recorded a long time ago if no input device is connected, and also added a text message to the log display (if people have audio turned down). For the other two issues I just explained that the screenshots are representative of the app, and that I need the microphone for VoIP, and requested additional information for the reasons my game failed those tests. Then I submitted a new version again.
The next morning, I again had an email waiting, stating that my game failed again. This time it only failed the VRC.Mobile.Input.1 one! That was a bit silly, the other two issues (which I did not change) now passed, while the only one I actually fixed failed again! Perhaps my error message which only showed up on the log display was not visible enough? I spent some time changing my subtitle code so that I can force subtitles for such error messages even if the subtitles otherwise are not active. I then submitted yet another build for the review.
It failed again! Although, this time I got back a longer result description, stating that people running the game on Gear VR can proceed to the missions without a controller, and then get stuck. The message also included a link to Developer Support, so it seemed like the review people got frustrated with me not fixing the problem... But, how could players click on the mission button if they have no controller?? Wait a minute, Gear VR has a touchpad on the side, can that be used for clicking on stuff? I tested my game on my Gear VR device with a battery out of my Gear VR controller. Sure enough, you can look at the mission button and touch the touchpad, and the mission launched! This was not what I had intended, so I added code to not allow the mission buttons to be clicked on unless you have a proper 3DOF controller or Gamepad connected. You can still click on other stuff in the main menu, as that causes no harm. I made yet another build, and again uploaded the game for review.
The next morning, I received yet another failure! This time the failure clarification was "The error message should be explicit as possible (remain on screen) until users connect an appropriate external input device". Okay, so the issue was probably the fact that I faded out the error message after a while, as I used my normal subtitle system to display the error message. Pretty embarrassing to keep failing the same thing over and over, so I decided to actually contact Oculus Developer Support and make sure I understood the problem correctly. One of the developer support people nicknamed RantingBob happened to be online on the Oculus Start Discord channel, so I asked him about this. He stated that indeed the error message needs to be shown as soon as possible when no controller is detected, and stay visible until a controller is connected. So, I fixed my warning to behave like this, and uploaded yet another build to the Oculus Store. Fingers crossed!
Phew, finally LineWars VR passed the Technical Review! Now begins the 2-3 week wait for the Content Review results. Hopefully the game is deemed store-worthy, so that the release date could then be set about two weeks forward from that time. That's all for this blog post, thanks again for your interest!
Sep 22nd, 2019 - LineWars VR is Feature Complete!
After the previous blog post I decided to focus first on all the missing features of my game, most importantly the subtitles, virtual keyboard for text chatting, and the leaderboards. I managed to get all those (along with some other stuff) implemented during the past month, so my game is now feature complete! A lot of minor enhancements are still needed, but the game is basically fully working now! Yay!
This Blog Mentioned in the August 2019 Oculus Start Newsletter
A few days after I wrote my previous blog post I got a nice surprise in my email inbox: The Oculus Start August Newsletter contained the following text snippet: "This month, we�re giving a special shout out to Oculus Start member Patrick Aalto for his delightfully robust dev blog, Line Wars, which is a fabulous example of how to craft and manage a dev blog." It felt pretty good to get some recognition for my blog, even though I mostly write it for my future self. This gave a noticeable bump in the readership for my LineWars web pages:
Subtitle Work
The first step in my work on getting the final missing features done was to implement the subtitle handling. I haven't gotten any offers for my request for subtitle translations, so it looks like the subtitle languages will be just English and Finnish (Suomi). That's not all that much of an issue, as the main reason for the subtitles was to keep my game as US CVAA compliant as can reasonably be done.
I needed to have subtitles for three different voice events in the game: Narration texts, cruiser officer voice messages, and all the battle chatter lines. I added a module to handle displaying a subtitle (and fading it out within some seconds), which can be called from all the locations in the code where I start the voice audio running. This was reasonably straightforward. I did have a bit of trouble getting my subtitle text files to load at first, though. I saved my subtitles from the Excel sheet into "eng.txt" and "fin.txt", but when I loaded those using Resources.Load<TextAsset>(fileName).text I got an empty string! Took me a little bit of googling to found the reason for this. I used the workaround and loaded it as bytes instead, and that worked until I tested the Finnish file which had Scandinavian letters like � and � in the file. Those showed up as boxes. Finally, I realized I need to convert the text files to UTF8 and load them as such to get everything working the way it should.
subString = System.Text.Encoding.UTF8.GetString(Resources.Load<TextAsset>(subLangs[langIdx]).bytes);All in all, I have currently 205 lines of subtitles (each line can contain several sentences, especially for the narration texts), which comes to about 1500 words. Still looking for translation offers, if you are interested!
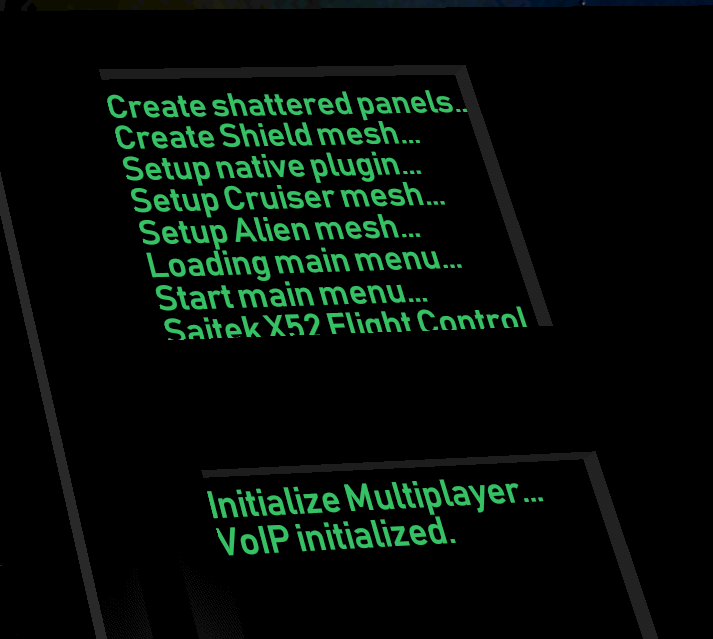
Game Startup Log
The next minor enhancement I wanted to do, was to have a scrolling log showing up when the game is loading. It is quite boring looking at just a static "Loading, please wait..." text during this time. The load phase of the game takes some time (currently 35 seconds on my Oculus Go, it is noticeably faster on my Gear VR device), so I wanted to have something the player can read while the game loads. Thus, I added a TextMeshPro field on the loading screen, and wrote a line to that log whenever a new step in the loading process begins. These same lines of text are shown in the main menu (station command console) upper small text display when the main menu starts up.
Female Avatar on the Cruiser Bridge
The next step was to create the female avatar for the Cruiser bridge. The Cruiser bridge had until now only had a male weapons officer avatar sitting on the left-hand side lower console, with the right-side console chair being empty. As I had also female voice actor saying the bridge officer lines like "Sir, the front shields are down!", I wanted to have both a male and a female officer on my cruiser bridge.
First, I checked how many vertices my Cruiser bridge currently had, to make sure I don't get over the vertex budget I have set myself of about 10K vertices for the cockpits (the Cobra cockpit currently has 9663 vertices, of which almost 8000 are just for the switches all around the cockpit). The Cruiser bridge had 4215 vertices (including the male avatar) before adding the female avatar, so it looked like I had a good number of vertices still available for the female avatar. I took the body of the male avatar, and just scaled it down to 95% to get the female body. Since the avatars are only shown from behind, the same body shape was fine for also the female avatar.
For the head I used the same head as I had done for the Station Bridge. I removed practically all of the face (as it is not visible), and added a red band to hold the ponytail. I had a long time ago decided that the best way to differentiate the male and female avatars (when they are only shown from the back) was to have the female avatar have a ponytail. :-) This did not take all that long, so pretty soon I had also the female avatar on the Cruiser bridge! The total vertex count went up to 5633 vertices, so still very well within the budget.
VR Comfort Settings
Back in February when RaMarcus first tested the Alpha version of my game, he recommended me to add some VR comfort settings. He thought I could simply have parts of the ship cockpit windows covered when using higher comfort settings. I decided to check how this idea might work. The simple thing would be just to add some polygons to cover the windows, but as I use procedurally raytraced shadows in my cockpit, that would have left the covered windows still passing sunlight, which would look weird. So, this was not quite as straightforward to do as it first sounds. However, since this only meant covering some windows, I only needed to remove parts of the window shadow configuration tests. As those are hardcoded into my shaders, this meant coding alternate shaders for those cases.
I started work with the maximum comfort setting, where I decided to only have the forward-facing window uncovered. This was easy, as I could just remove all the side window shadow configuration. Well, easy with Cobra and Cruiser, but not so much with Pirate cockpit, as that has a bubble canopy. For Pirate cockpit I still need to figure out a different method of handling the VR comfort settings, perhaps as a shroud covering the cockpit. This will need additional shadow configuration instead of simplifying the existing one. I added a new CobraCockpitMaxShader into the Resources folder of my game. I then did also the Medium level shaders, covering all but the forward-most side windows in the Cruiser cockpit, and covering half of the side windows in the Cobra cockpit.
Next, I needed to handle the actual changing mesh of the Cobra cockpit. Here I decide to go with a system where the original mesh already contains the vertices (and their UV coordinates, normals and such) for these covered windows, but the triangles list is missing them. This way there is not much of a performance effect when not using these comfort levels. A few extra vertices are insignificant compared to the total vertex count of several thousands. What remained was just code to handle the changing comfort level. Here below is the code for the Cobra cockpit, where this method has the cobraInst gameObject as input. This object is a child of the CobraCockpit gameObject, which is why I use its parent to access the cobraCockpit mesh.
    if (comfortLevel > 0)
    {
        // Get the CobraCockpit mesh
        Mesh ccMesh = cobraInst.transform.parent.gameObject.GetComponent<MeshFilter>().mesh;
        int triCnt = comfortLevel == 2 ? 8 * 3 : 4 * 3;
        int vCnt = ccMesh.vertexCount - 8 * 3;
        int[] oldTris = ccMesh.triangles;
        int tCnt = oldTris.Length;
        int[] newTris = new int[tCnt + triCnt]; // Use 3 vertices for each new triangle (using 3 slots), so the new counts are in sync
        oldTris.CopyTo(newTris, 0);
        for (int i = 0; i < triCnt; i++)
            newTris[tCnt + i] = vCnt + i;
        ccMesh.triangles = newTris;
        // Switch the main shader to not let light in from the covered windows
        Transform parent = cobraInst.transform.parent;
        parent.gameObject.GetComponent<Renderer>().material.shader =
            Shader.Find(comfortLevel == 2 ? "LineWarsVR/CobraCockpitMaxShader" : "LineWarsVR/CobraCockpitMedShader");
    }
I let each new triangle have their own vertices, so it was very easy to set the vertex numbers to the triangle
indices. This code is run when the scene starts, so it can take a little bit of time, but preferably not a lot.
It does cause some garbage, but as I hope not many people will need to use these comfort settings, I doubt that
will be much of an issue in general. This is also why I did not bother caching any of the objects or components
I need to access there.
Shader Performance Improvements (Yet Again)
As I had to do new versions of my cockpit shaders for the VR Comfort settings, I decided to also spend some time doing yet another optimization pass on those shaders. I find this optimization work to be the most rewarding part of working on my project, so I always look for excuses to do a little bit of optimizing!
As an example, I show you what I did with my CobraJoystickShader. This shader handles drawing the joystick and related game objects (including the throttle hand and the moving arms of the pilot avatar) in the Cobra cockpit. Most of the shader time is spent checking for the shadow planes (sun shining through the three separate windows, with a center bar in the middle of the forward window causing an extra shadow).
    fixed4 frag (v2f i) : SV_Target
    {
        // Sample the texture, use the texture atlas as an RGB texture
        fixed4 col = tex2D(_MainTex, i.uv.xy);
        fixed4 shCol = col * i.normal.w + col.g * _SunColor * min(_SunColor.a, i.normal.w);;
        // ---- Check if we might be affected by the main light ----
        half dotProd = dot(normalize(i.normal.xyz), _ShadowsLightDir);
        if (dotProd <= 0)
            return shCol;
        if (i.shadowData2.x > -0.05 && i.shadowData2.x < 0.05)	// Center bar shadow
            return shCol;
        fixed4 sunCol = shCol + col * dotProd * _SunColor;
        if ((i.shadowData1.x > -0.85 && i.shadowData1.x < 0.85 && i.shadowData1.z > -0.51307 && i.shadowData1.z < 0.14581) ||
            (i.shadowData1.y > 0.1838 && i.shadowData1.y < 0.62579 && i.shadowData1.w > -1 && i.shadowData1.w < 0.14581) ||
            (i.shadowData2.y > 0.1838 && i.shadowData2.y < 0.62579 && i.shadowData2.z > -1 && i.shadowData2.z < 0.14581))
            return sunCol;
        return shCol;
    }
The performance of this shader was as follows (on a Mali-T760 GPU):
  4 work registers used, 1 uniform registers used, spilling not used.

                          A       L/S     T       Bound
  Instructions Emitted:   21      4       1       A
  Shortest Path Cycles:   3       2       1       A
  Longest Path Cycles:    7       4       1       A
I did several optimizations to this shader:
- Immediately when I started working on this shader, I noticed I used normalize to make sure the normal vector stays unit-length. This is a somewhat expensive operation, as it needs to calculate the length of the vector, which involves a square root operation. I could easily get rid of this without a noticeable loss of visual quality, as the normal vector will always be unit length before it gets interpolated.
- Actually, calculating the lighting dot product for every fragment is a bit overkill as well, assuming you have a mesh that is sufficiently dense. I could calculate the lighting dot product in the vertex shader, and just interpolate over the result in the fragment shader. This would not work well if I had any specular lighting in the shader, but these objects all use just diffuse lighting (they are not shiny).
- The above allowed me to replace the 3-element normal.xyz interpolator with a single interpolator element. As I used normal.w to emulate ambient light intensity, I would still need a 2-element interpolator. However, since I only used a 2-element UV interpolator, I was able to get rid of the whole normal interpolator, and instead use uv.xy for UV coordinates, uv.z for the precalculated lighting dot product, and uv.w for the ambient light intensity. This got rid of one load/store cycle.
- The biggest change was to start using abs for the shadow plane limit checks. The abs operation
is basically free in the shader, and in addition to that, using it allows me to check all directions with the
same less-than operation, so the shader compiler can combine all the checks together into a single vector
check, like this:
u_xlatb2 = lessThan(abs(vs_TEXCOORD1.xzyw), vec4(0.850000024, 0.329439998, 0.220994994, 0.572905004));
This meant I had to add a bias to the ranges in the vertex shader, and then use half the full range in the tests here. - I also moved the sunCol calculation inside the if clause, although this does not actually affect the performance (as the shader compiler is smart enough to do that by itself). It just looks a bit better.
    fixed4 frag (v2f i) : SV_Target
    {
        // Sample the texture, use the texture atlas as an RGB texture
        fixed4 col = tex2D(_MainTex, i.uv.xy);
        fixed4 shCol = col * i.uv.w + col.g * _SunColor * min(_SunColor.a, i.uv.w);;
        // ---- Check if we might be affected by the main light ----
        if (i.uv.z <= 0 || abs(i.shadowData2.x) < 0.05)	// Sun behind the polygon or center bar shadow
            return shCol;
        if ((abs(i.shadowData1.x) < 0.85 && abs(i.shadowData1.z) < (0.14581 - -0.51307)/2.0) ||
            (abs(i.shadowData1.y) < (0.62579-0.1838)/2.0 && abs(i.shadowData1.w) < (0.14581 - -1.0)/2.0) ||
            (abs(i.shadowData2.y) < (0.62579-0.1838)/2.0 && abs(i.shadowData2.z) < (0.14581 - -1.0)/2.0))
            return shCol + col * i.uv.z * _SunColor;
        return shCol;
    }
Performance of the improved fragment shader looks like this:
  4 work registers used, 1 uniform registers used, spilling not used.

                          A       L/S     T       Bound
  Instructions Emitted:   12      3       1       A
  Shortest Path Cycles:   2       2       1       A, L/S
  Longest Path Cycles:    3.5     3       1       A
So, I got rid of one L/S cycle, and managed to drop the worst-case arithmetic cycles from 7 to 3.5! That is,
the new shader is two times faster than the original one, without a noticeable loss of visual quality!
Optimizing this shader was time well spent, in my opinion.
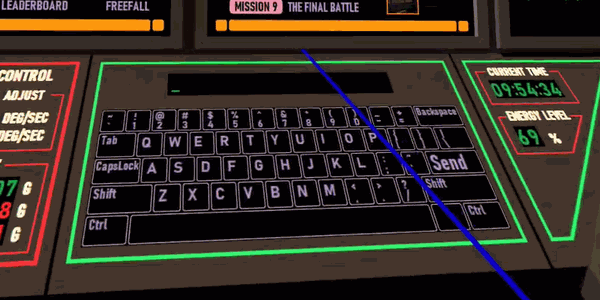
Virtual Keyboard
Next, I decided to work on the virtual keyboard, for text chatting while connected to another player. This virtual keyboard is also part of my attempt to follow the US CVAA legislation. The keyboard makes the game not dependent on being able to chat via VoIP when conversing within the game. I had already added the keyboard keys and made them have separate UV coordinates, but I had not yet implemented any code to actually handle typing on the virtual keyboard.
It did not take me all that long to implement the code. I have implemented virtual keyboards in the past for my prior projects (like DSx86), so it was just a question of writing the code. Took about one day of work to get all the stuff working. I also had to make a small change to the multiplayer protocol, to pass the texts back and forth. The messages will be visible on the lower small green text display on the forward console.
This was also the first time I recorded any video from within Oculus Go itself. Seemed to work fine, except it only has a 1024x1024 resolution and the audio seems to not be in sync, but otherwise quite useful!
Leaderboards
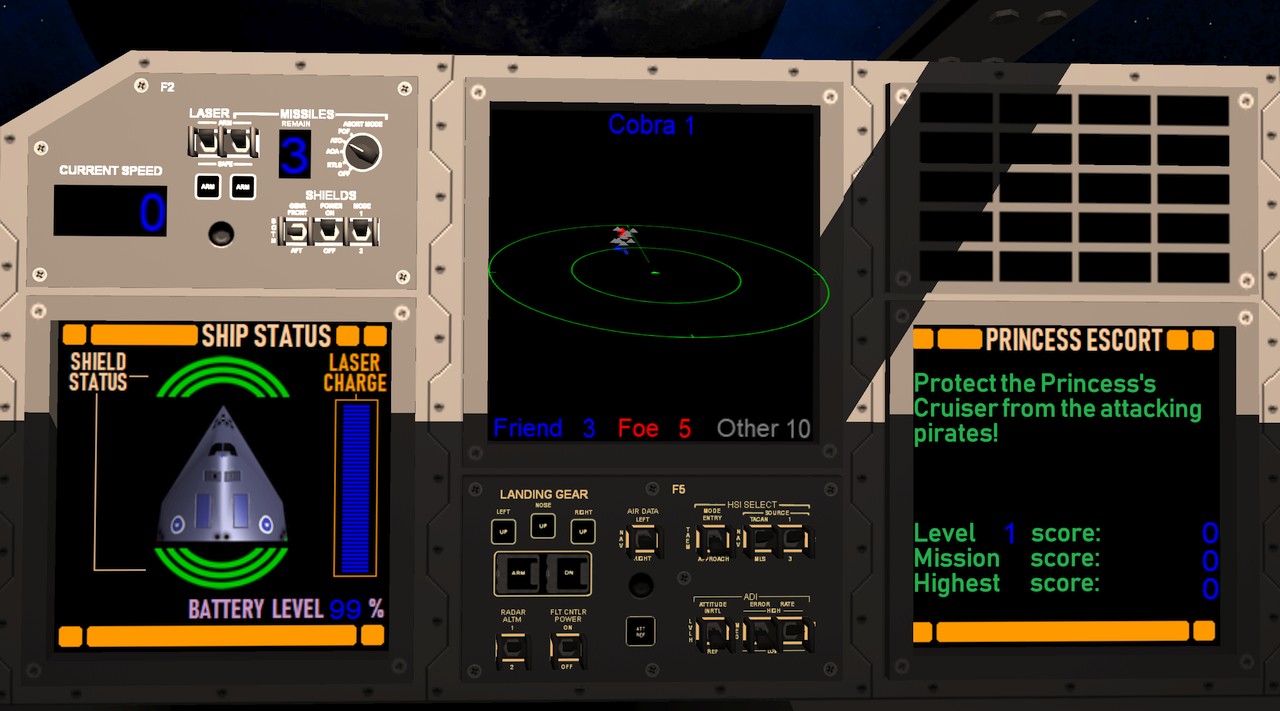
After the virtual keyboard done, I realized I only have one other major feature not yet implemented: the leaderboards! So, I decided to tackle this next, as it would be nice to be able to finally make LineWars VR feature complete! I studied the Oculus Platform instructions about Leaderboards, and found them to be simpler to implement than I had feared. It took me much longer to work on the displaying of the leaderboard data than it took to create the leaderboard updating and data fetching.
I created a separate leaderboard for each mission (so 9 leaderboards in total), and then played the game so that I got some data into the leaderboards. I had planned to use the left front display panel in the main menu Station bridge to display the leaderboards on. There are buttons to switch between Instructions, Leaderboards and Freefall comic on this display panel. What was still missing was the way to select which mission you want to check the leaders for. Thus, it was time to still make some changes to my mesh for the Station bridge instruments, and add these new buttons.
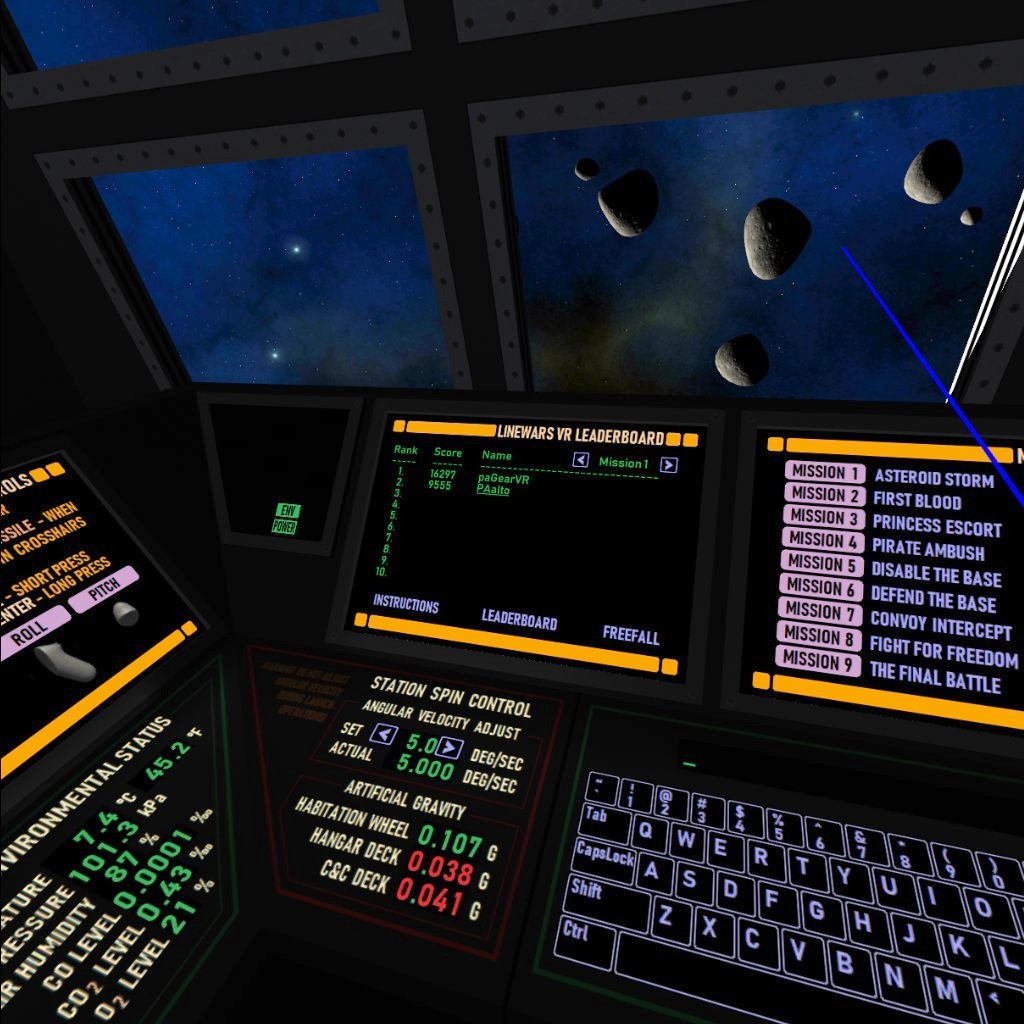
The image above is a screenshot from Oculus Go, as the leaderboards are not working in the editor. I was able to fit 10 rows on the display panel, so I coded it so that if the current user does not fit into the top ten, the last position shows the current player's score and their correct rank (instead of "10"). The current user is also underlined in the list. There would still be room to add other information, like the highest level reached in the mission, which I might still add to the list. Also, the score number should be right-adjusted instead of left-adjusted. These are on my TODO list.
Self-Destruct Handling
Okay, with the leaderboards done, I practically had all the major planned features implemented! LineWars VR is now Feature Complete, and thus officially in the Beta stage! Yes! The end of the long development time is finally in sight!
I still had a lot of minor features missing (or half-implemented), along with bugs to fix as well. The first minor feature was the self-destruct handling, when the player clicks on the self-destruct button on the side consoles. I had recently got the "Warning! Self-Destruct In 3.. 2.. 1.." voice clip from one of my voice actors, so I decided now was the time to implement that.
Implementing the self-destruct was not too difficult. When the user clicks the button, a five-second timer starts, along with the audio, and when the timer is done, I launch an explosion animation very close to the camera, and then just call Application.Quit() a short time after that. At first, I wondered why nothing happens when I tested this in the editor, until I read from the documentation that Application.Quit() does nothing in the Unity editor (as the "Application" in this case is the whole Unity editor application!). Works quite fine in the Oculus Go, though.
Configuration Panel Fully Working
Another item on my TODO list was that I had not yet implemented all the buttons on the main configuration panel. As choosing the preferred controller was the only item missing, I wanted to get that done and thus one more item off my TODO list. I originally had a bit of trouble deciding how I should handle choosing the controller (between Oculus Go / Gear VR controller and a possible connected gamepad), as either of those could be connected and unconnected at any time. Until I got the idea that the player does not need to choose the active controller, they just need to choose the preferred controller, so in the case of both an Oculus Go controller and a gamepad being connected, the game would choose which ever the player prefers for controlling the ship.
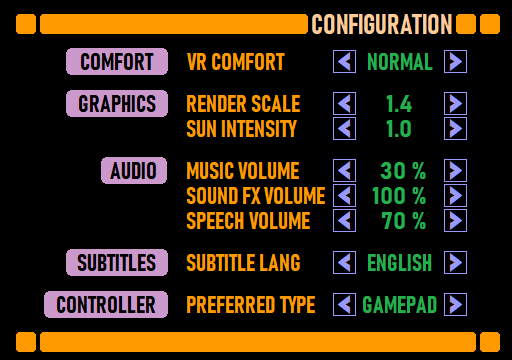
Figuring that out made it easy to implement the configuration panel settings fully, so that is now off my TODO list. I do still need to handle the switching of the controller based on the configured preferences on the fly within the game, though. That is just one of the many still remaining minor issues and things to fix on my TODO list.
That's all for this time, thanks again for your interest in LineWars VR and this blog!
Aug 25th, 2019 - Multiplayer Missions Done!
Yay, now I have both the single-player and multiplayer missions all implemented! However, after the previous blog post I first worked on the ship cockpit display panels. They had begun to look rather boring to me, compared to the LCARS-like display panels of the main menu station bridge. I thought it might be a good idea to have the ship cockpit display panels share the same look as the main menu, and thus spent a few days improving the look of these cockpit display panels. I added the same kind of header and footer bars, and changed the colors to match those of the main menu. This made the cockpits a bit more colorful and thus nicer looking, in my opinion.
I had originally used TextMeshPro for displaying the mission description, but a while ago I decided to stop using that and simply have the descriptions in the texture. That way I could get rid of TextMeshPro completely in the actual mission scenes. However, I now realized I need to have some dynamic text in the network missions (name of the network player, for example), so I decided to revert that change and go back to using TextMeshPro for the text display. This may cause a bit of a performance hit, but luckily, I don't seem to suffer from performance issues at the moment.
Abstract Multiplayer Mission Base Class
At the beginning of August, I then decided to tackle the major remaining chore, creating all the multiplayer missions. I had made Mission 2 multiplayer version earlier, so I had a sort of framework in place for the multiplayer stuff. However, I wanted to have both co-operative and player-vs-player multiplayer scenes, so I had to have two different kinds of multiplayer scenes, with different scoring. I set myself a goal of having all the multiplayer missions done by the end of August, so I had one full month budgeted for this work.
The first step was to create a new abstract base class SceneBaseNet, which inherits from my normal SceneBase abstract class. This way I could collect all the network-specific initialization and packet transfer routines into one class, and automatically have them included in all the multiplayer missions. This base class is relatively simple. It has the following routines:
- SetupMissionText(TMPro.TextMeshPro tmp), which sets up the mission description (including the name of the network player and such), based on the mission-specific abstract MissionTextBase string property.
- NetCreateMission() method, which gets called after the main mission-specific CreateMission() method, and handles the distribution of the computer-controlled ships to each network party, and things like that.
- An abstract GetGameData() method, which the actual mission-specific scene classes need to override. This method handles the interpretation of the received network game data packet. I decided to let each mission class take care of this data interpretation, after I realized how each mission has their own specific data transfer needs.
- An abstract SetGameData() method, which is the opposite part of the above. Each mission decides what data it needs to send to the network party.
- a new Update() method, which handles the receiving of the network data packet, all the stuff that the main SceneBase class does (like moving all the ships), and finally sending the latest state over the network.
Shared Random Numbers
Next, I needed to have a way to use synchronized "random" numbers across the network. I had used UnityEngine.Random for a lot of stuff in the single-player missions, but in the multiplayer missions almost everything needs to be synchronized across the network, so both players see the random asteroids at the same locations and such. I added code to the main menu network packet to send a random number to the other party, and when both parties have received the random number of the other party, they switch to using the lower of these numbers. This way I had a common seed for the random numbers. Instead of using this number as a seed for the UnityEngine.Random, I decided to have a separate random number generation for the networked random numbers. I added a table of 256 fixed random numbers between -1000 and 1000, and a code to take a number from this table:
    public static int GetRandom(int idx)
    {
        return netRandomNum[(myRandom + idx) & 255];
    }
That code gets an index as a parameter, and uses a myRandom seed (which is the shared seed number transferred while in
the main menu). This way when a mission needs to create an asteroid, for example, it can use GetRandom(n) to get the
X coordinate of the n:th asteroid, and it will be the same coordinate for both network players.
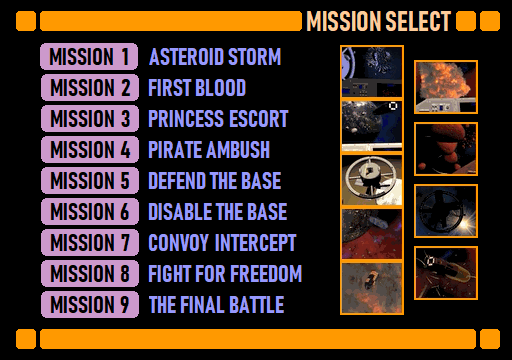
Mission 1 Special Needs
Soon after staring work on Mission 1 ("Asteroid Storm"), I realized I had some issues with it. In the single player mission, everything is based on a time code. Each asteroid has a predetermined time when they hit the starbase, so I can skip a heavy collision test that should be run every frame. I just need to check how much time has elapsed since the mission start. However, with multiplayer missions, the scene will not begin at the exact same absolute time across the network, and thus the timing will not be exactly synchronized!
This is a co-operative mission, and the first symptom of this timing difference caused the mission not to end for the other player, when one player has an asteroid hitting the base. This was caused by the "faster" game sending (in the alive bit vector) information that the asteroid got destroyed (when it hit the starbase), but in the "slower" game this just meant the asteroid got destroyed before it hit the base, and thus the game continued!
At first, I tried to synchronize the game times, but after a while it began to look like this might be a lost cause. Due to the varied network latency, I can never get the timing exactly correct, so it would probably be better to just allow for different timings. Based on some debugging, the first level could have timing mismatch of up to a couple of seconds, but after a scene reset (going to next level) this dropped down to around the network latency value (a couple of hundred milliseconds at most). That is because the first level start time depends on how fast the device loads the scene (here my Samsung Galaxy S6 is several seconds faster than my Oculus Go), but the scene reset is quite fast on all devices.
Instead of trying to synchronize the timing, I decided just to send a flag whenever the starbase got hit. The level ends with a failure when your own game sees an asteroid hitting the base, or you receive from the network info about an asteroid hitting the base. This seemed to be a good and simple solution for this problem.
Scoring for Multiplayer Missions
Next, I worked on handling the scoring correctly for the multiplayer missions. In the single-player missions I just calculate a level score, total score for the mission, and then show the highest ever score achieved in this mission. That is not very useful for the multiplayer missions, so I needed to change that. I can still calculate the level-specific score the same way, but I decided to replace the "Mission score" and "Highest score" with "Your score" and "network player score", where the network player is replaced by the Oculus ID of the player you are playing with or against.
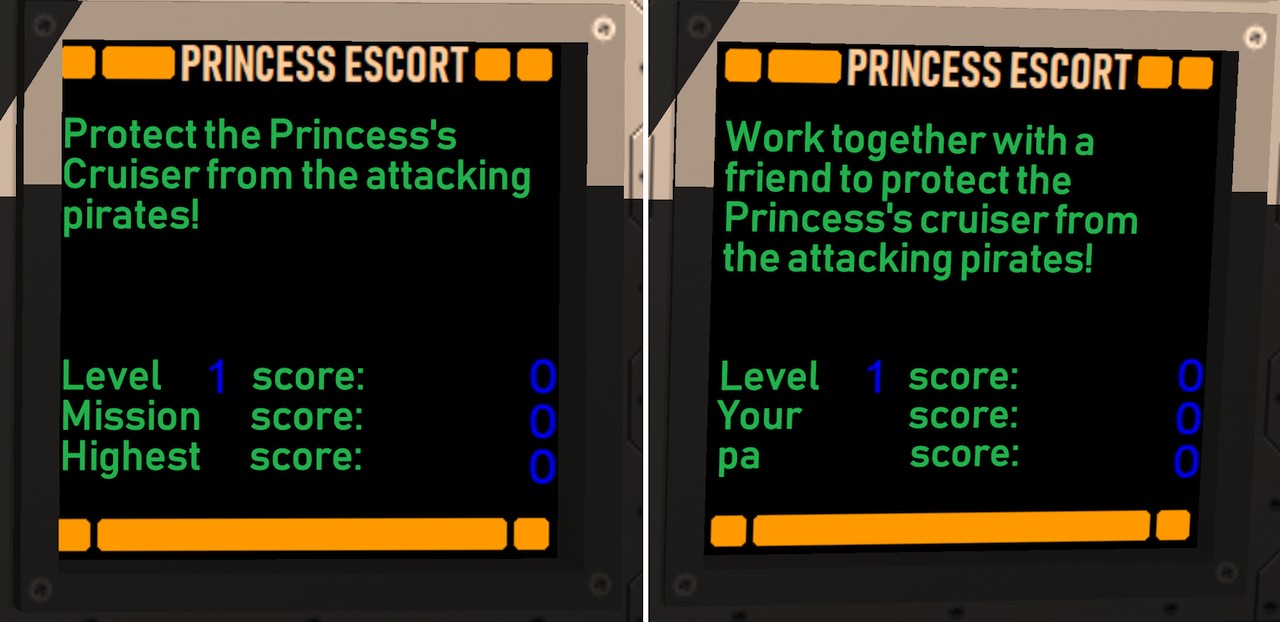
The "Your score" behaves a bit differently in co-operative and PvP missions. In co-op missions it counts only kills made by ships you control, while in PvP missions it counts all enemy kills (just like the "level score" value). This score is sent to the network player as well, and displayed on the third score line on their cockpit. Thus, you can have a friendly competition also in co-op missions, to see who gets the higher score, even though you are fighting on the same side.
Co-operative and Player-vs-player Missions
Next, I wanted to figure out which missions would be co-op and which PvP missions. I wanted to have the same nine missions available as both single- and multiplayer versions, to keep the overall story of the game coherent. This also makes it possible for veteran players to help out new players get into the game. Some of the missions were clearly better suited for co-operative play, like Mission 1 "Asteroid Storm" and Mission 3 "Princess Escort". In the first single player mission you are fighting against asteroids with a computer-controlled ship, so that is clearly well-suited for co-op play with another human. Mission 3 is similarly about protecting a single cruiser, so making that PvP would be difficult to balance correctly, as one side would have a cruiser to fly and the other side not. Thus, these are clearly co-op missions.
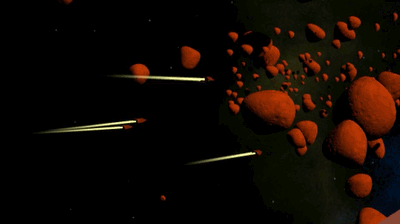
Missions 2 "First Blood" and 4 "Pirate Ambush" have a fleet of Cobras against a fleet of Pirate ships, so those work fine as PvP missions. By the way, when testing Mission 4 network play in the editor, I happened to capture this rather neat-looking clip of some computer-controlled friendlies navigating an asteroid field. Seems rather Star Wars -like, which is a bit of what I am aiming for with my game.
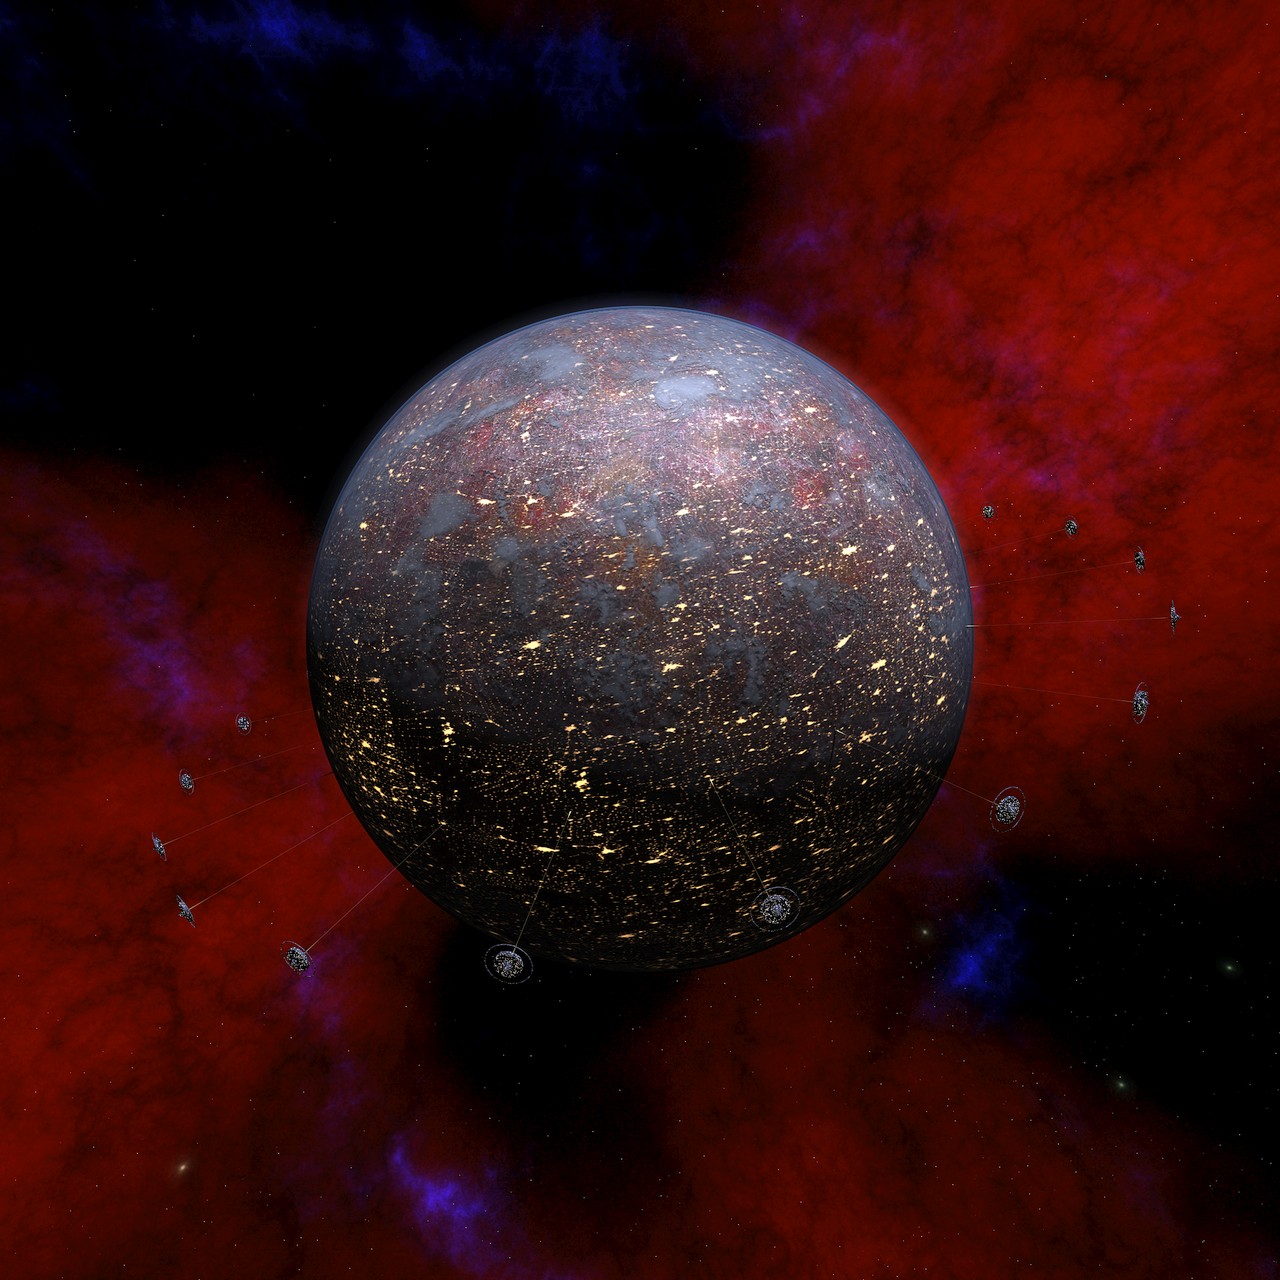
For the remaining missions, I decided to go with PvP for missions 5 and 6 (as those are pretty much mirror images of each other), and then co-operative for the remaining three missions. I also took some time to make a proper skybox for Mission 7, where the player is intercepting a convoy of cruisers leaving a heavily industrialized planet "Trantor". I created a texture for the planet surface using some NASA Visible Earth City Lights textures for the glowing cities, and then just some rusty metallic surface material. I also added some Space Elevator structures orbiting the equator of the planet, to give it an even more industrialized feel. I chose a blueish sun color (from an excellent star color list by Mitchell Charity) to contrast with the reddish nebula background. I am not an artist, but I think this image turned out pretty well.
Gear VR Tests
After I had managed to create all the multiplayer missions, it was time to test them. I planned to use a friend of mine who has Gear VR system with his Samsung Galaxy S7 phone for this initial testing. That meant I had to make sure my Gear VR support had not gotten broken while I had been testing the game only in the editor and on my Oculus Go.
I did find some issues on Gear VR. Some of these were something I was aware of already, but some took me by surprise.
- The Cobra cockpit displayed Oculus Go controlled instead of the Gear VR controller. This issue I knew I had, as when I improved the look of the cockpit display panels, I only implemented the Oculus Go controller legend display. So, I spent a little while implementing a better Gear VR controller display as well, and adding code to switch to displaying this legend when the game is running on Oculus Go.
- The blue beam from the controller in the main menu was too wide and long. This was a bit of a silly issue, I guess when I originally added the controllers to the main menu, I had not bothered to fix the Gear VR controller beam while I fixed the same thing for the Oculus Go controller. What goes around comes around, it seems.
- The controller got disabled when returning to main menu from a mission. Here I was using a static variable to keep track of whether a controller was detected, so when the main menu scene restarted, the static variable had a value of the controlled having already been detected, so it did not get re-enabled. No reason for this variable to be static, and changing that fixed this issue.
- The furthest corner of the main menu station bridge seemed to have some texture issue; it was too bright compared to the surroundings. This was a strange issue, as everything looked fine both in Oculus Go and in the editor. For some curious reason this turned out to be caused by my having very small texture area (like only two pixels wide within the texture) for a rather large polygon (a couple of meters per edge). Since the polygon had a flat color, I increased the texture area used for it, and this seemed to fix the issue. A bit curious issue, probably some sort of mip-mapping difference between my Samsung Galaxy S6 and Oculus Go GPUs.
-
The biggest issue was that looking back in the main menu caused severe framerate drops! I knew my main menu shader was the
most complex and performance-heavy of all my shaders, with an arithmetic cycle usage (on Mali T760 GPU) of between 1.5 and 11.5
GPU cycles. When the rear of the station bridge was completely in shadow, the shader had to check all windows for light,
and thus it used the longest path of 11.5 GPU cycles. This combined with the 1.4 render scale (1440x1440 pixels per eye)
made the shader a bit too heavy for the Samsung Galaxy S6 to handle at 60 fps.
Luckily, I know that Samsung Galaxy S6 is the slowest Gear VR supported device, and used by less than 5% of all the Gear VR owners, so if the main menu has some frame drops when looking backwards when the sun is not shining on the slowest Gear VR device, I suppose that is not a huge issue. But it made me decide to implement the user configuration to change the render scale in the near future.
Multiplayer Testing Between Oculus Go and Gear VR
After I had fixed most of the Gear VR support issues, it was time ask a friend to help me in testing the multiplayer missions. I used my Oculus Go, and he used his Gear VR together with Samsung Galaxy S7, and off we went into the multiplayer missions!
He immediately reported a strange texture issue in the main menu. All the textures seemed to rotate and swim strangely. They stopped rotating when the station rotation was stopped, but even so the textures did not look at all correct, instead they showed up as some brown stripes. That was pretty weird, as everything looked fine on my Oculus Go and my Samsung Galaxy S6. We decided to ignore that issue for now, so we could focus on the actual multiplayer stuff.
Luckily, there did not seem to be anything majorly wrong in the actual multiplayer missions. No texture issues in any of the ship cockpits, and we played several missions, until my Oculus Go started to get out of juice (only 25% charge remaining). At that point we had found only two issues (in addition to that main menu texture problem):
- The music and effects audio volumes were too high compared to the VoIP volume. I had decreased the music volume to 30% when VoIP gets connected, but had not changed the effects volume at all. I decided to add separate volume configuration settings for when the VoIP connection is active. So, you can have different volumes when playing single player, and another volume configuration for multiplayer with VoIP active.
- Missiles launched by one side were not always visible for the other party. I later found out I had not included the missile handling into the first mission data transfer at all (a silly oversight), and in the other missions it was possible for the remote side to accidentally kill a missile launched by the local side, before the missile actually got created on the remote side.
After we stopped that game session, I began to look into potential reasons for the weird texture problem. I had run into a somewhat similar texture issue on my Samsung Galaxy S6 a long time ago. That was somehow caused by the interpolators sent from the vertex shader to the fragment shader getting somehow mixed up. The fix for that was to use float4 interpolators all around, not having some float2 or float3 vectors in between. I thought this new issue might be something related to that.
My original interpolator struct in this station bridge shader looked like this:
    struct v2f
    {
        float4 vertex : SV_POSITION;
        float4 uv : TEXCOORD0;
        float4 gi: TEXCOORD1;
        float4 winFwdTopShadow: TEXCOORD2;
        float4 winSideShadow: TEXCOORD3;
        float4 shadowPos: TEXCOORD4;
        float4 shadowData: TEXCOORD5;
        float4 shadowPos2: TEXCOORD6;
        float4 shadowData2: TEXCOORD7;
    };
The UV coordinates were the first parameter of the struct, so I did not quite understand how that could get messed up.
I did however notice, that the gi parameter gets its value directly from the mesh color data, so it is
basically just low-precision fixed values, even though I send it as full-precision float values. Perhaps that causes
some issues?
I decided to experiment by moving the UV coordinates a bit further in the struct (as those are the most important data I send, all the rest have to do with the shadows, which are not quite that important). I also moved the lower-precision gi vector to the end of the struct, and changed it to be sent as fixed values instead of the full float resolution. I sent a new version to my friend to test, assuming the problem might at least look a bit different now. To my surprise, he reported that all the issues were gone, everything looked normal! Well, that was good, but it is a bit unnerving to have such weird issues in my shaders.
    struct v2f
    {
        float4 vertex : SV_POSITION;
        float4 winFwdTopShadow: TEXCOORD0;
        float4 winSideShadow: TEXCOORD1;
        float4 uv : TEXCOORD2;
        float4 shadowPos: TEXCOORD3;
        float4 shadowData: TEXCOORD4;
        float4 shadowPos2: TEXCOORD5;
        float4 shadowData2: TEXCOORD6;
        fixed4 gi: TEXCOORD7;
    };
Subtitle Work
The last bit of work I have been doing this month is working on the subtitles. A long time ago I decided to have subtitles for my spoken parts, to make things easier to understand for people with hearing disabilities or not that fluent in English. Originally, I was thinking of having just English subtitles, but I realized it would not be much of a technical hurdle to have subtitles in several languages. The only problem is the translation of the subtitles, and thus I created a Reddit post asking for help in translating my subtitles to various languages. Hopefully I find some people interested in that work! If you think you can translate my subtitles (around 1500 words, with a lot of quite similar sentences) to a language other than Finnish, let me know!
That's all for this month, thanks again for your interest in LineWars VR!
July 28th, 2019 - TODO List Work Started
First off, apologies for the extensive length of this blog post, and for the possibly higher than normal number of typos and grammatical errors. We have had quite a heat wave here (same as all around Europe, I believe), and my brain does not work quite at full capacity when it is very warm. Anyways, during the last month I finally managed to start the next stage of my work on this project, going through my TODO list! Until now I have only worked on the essential features, which have been so obvious that I have not had a need to even write them down. Now I got all the absolutely essential features mostly done, so I began looking at my long TODO list and work on various half-implemented features on the list. At first, I continued with the Station Bridge (main menu) scene, though.
Station Bridge Work Continues
After I got the previous blog post written, I still worked a couple of days to get all the shadow config for the bridge implemented. There are still a few shadows that are not quite correct, and I could still add more fine-grained shadows on the actual console surfaces, but those are minor enough issues that I decided to just write them to my TODO list and then move forward.
I had mostly worked on the inside of the station bridge, but you can actually see the front of the station and the opposite side control tower when looking straight up. Those did not yet have correct textures or shadows, so that was what I worked on next. I made somewhat simplified shadows for the top control tower, as that is not very visible. The textures also needed some work, as I had just copied that part from the actual Station mesh object, and then made some changes. I wanted to use the same texture atlas as the main Station Bridge object uses, so I had to switch all the texture coordinates. I decided to do this while importing the mesh, as that way I did not need to manually change the textures in Cinema 4D.
After that I decided to add some UI audio effects, so there is a small audible click whenever the player clicks on a UI button. I also added some hover audio, so there is an audible indicator when the controller ray hits a button that can be pressed. After the audio effects work, I decided to fix the timing of my ship launch video, which will be shown on a couple of display panels whenever the station launches a new ship. This video is supposed to be from a camera inside the station hangar drum, and it shows a ship launching from the hangar deck, moving towards the center of the drum, and then starting the main thrusters and flying out of the station. I added some rumbling sound effect to accompany this video, which worked quite nicely. You can first look at this video on the display panel, and then look up to see the ship flying out of the station "mail slot".
TinyCruiser And TinyStation Radar Meshes
After I had made a simplified Space Station mesh to be displayed in the middle of the holo radar in Station Bridge, it occurred to me that I should use the same system in the Cruiser Bridge, which also has a big holo radar (although only quarter of the size of the Station Bridge holo radar). For that I needed a simplified Cruiser mesh, which I called TinyCruiser. I simplified the original Cruiser mesh, and ended up with a mesh that had 713 vertices and 378 triangles. The TinyStation had 1175 vertices and 1800 triangles. It is interesting how the vertex counts do not differ all that much, but the triangle counts differ a lot. This is due to the Cruiser having sharp angles while the Station is rounder, as those sharp angles always need duplicated vertices. The triangle count is a better indicator of the mesh complexity than the vertex count.
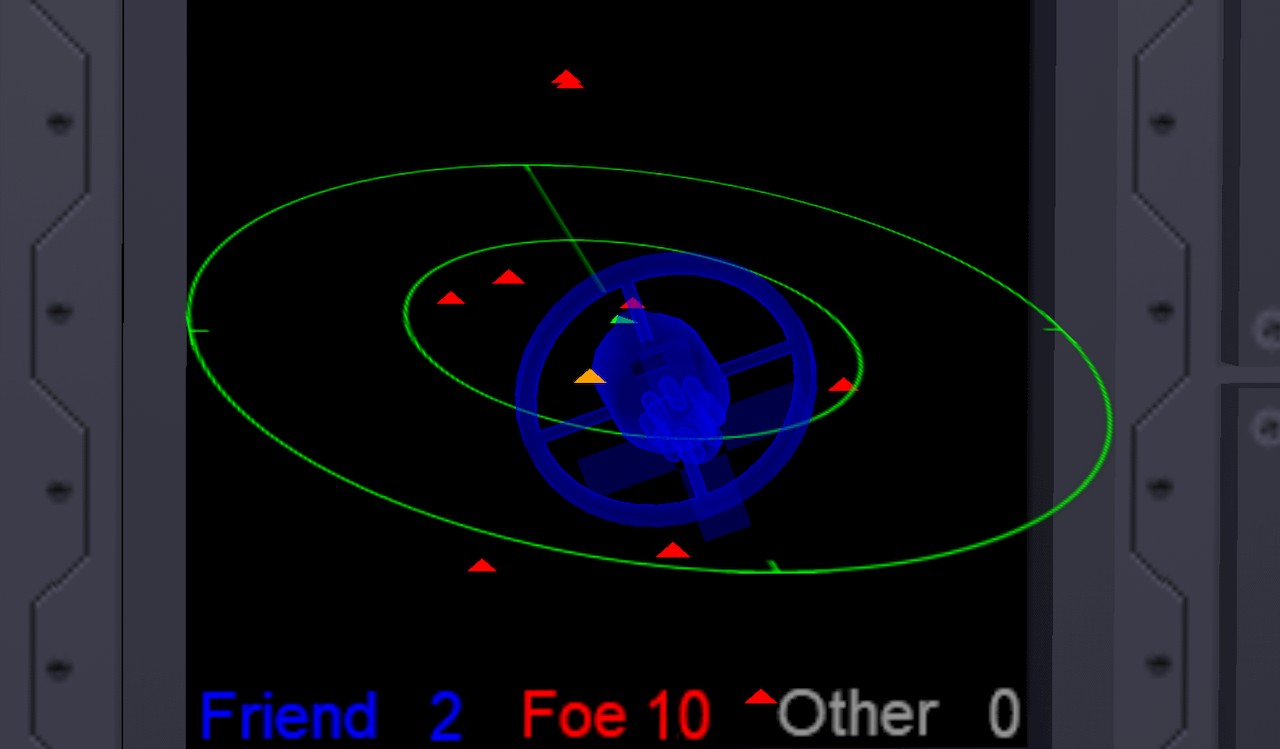
The TinyStation and TinyCruiser objects worked so well in those big holo radars, that I decided to go still one step further with this idea. I changed even the fighter ship radar displays to show the "capital ships" (meaning the Station and the Cruisers) as proper meshes. I just had to make some additional scaling for those meshes, as the fighter ship radars have dynamic range. The scaling of these meshes depend both on their distance and on the distance of the furthest object on the radar. The result was pretty good, and it helps with the problem some alpha testers have reported where they lose track of where the station is in relation to their own ship. Now the station direction and orientation should be much easier to figure out from the radar.
Here below is an image showing what the Cobra radar looks like right after launching from the station in Mission 1.
Mission 8 Implemented
At this point I realized that I only needed to create the Mission 8, after which I would have all of my single player missions working, and all the major features of the game implemented! Even though there would still be a lot of work remaining, with the multiplayer missions, and polishing all the existing features, I thought this would be a big symbolic step if nothing else. I took Mission 3 as the basis (as Mission 8 is slightly similar to it, you just fly different ship class), and started work on it. It did not take a lot of time to get the core of the mission working. It still needs a better skybox (same as some other missions), but it is now running and playable!
Woohoo, my game now contains all the major features! Time for a celebration! Well, not really, it was now time to start looking into my long TODO list, and implementing stuff that would be more work to do after implementing the multiplayer missions. That is, I wanted to make the changes that affect both the single-player and multi-player missions only once, so I wanted to do those before duplicating the mission scenes.
Station Damage Panel Work
One of the major issues in my TODO list was the station damage handling, especially in Mission 1. I had already created some laser hit damage effects, and even some collision effects, but only for a few parts of the station. The outer section of the habitation ring (where many of the asteroids in Mission 1 hit) was still without damage handling, and also the back (stationary) part of the space station, including the solar panels, did not yet get damaged at all. Thus, I started my work on the TODO list from this issue.
I began the damage work improvement with the habitation ring window panels. The damage states for the windows furthest from the center had been made earlier, so I made similar damage states for the upper level windows. This was not terribly difficult, but rather time-consuming, as the code that handles the damage state switching needs to have all the texture coordinates of all the states manually input. When I later made the Cruiser damage system, I had learned from this mistake and made the damage panels texture coordinates always a multiple of 128, for much easier setup. It is too late to change the space station damage system at this point, though. Here are the various damage states of the ring window panels:

After the windows, I also added damage states for the station outer rim, including some fire animations. After that I wanted to do some improvements with the collision system. I thought the deforming station mesh I had earlier in Mission 1 looked pretty bad, so I wanted to replace that with something better. Fighter ships colliding with the space station looked fine in my opinion, so I thought that might be the easiest way to handle also the asteroid colliding with the station.
My collision detection routine returns the collision position and the triangle index that gets hit, so my fighter ship collision handling was based on finding the closest vertex of the hit of this triangle that got hit, then finding all the neighboring triangles of this vertex, and going to the highest damage state (fire animation if such is available) for all those triangles. Since most of my damage panels are actually handled as quads, this meant damaging also the adjacent triangles.
That system has used two helper lists, a VDup (vertex duplicates) list and a V2t (vertex-to-triangle) list. The former contains a list of other vertices sharing the same position for each vertex, and the latter list has a list of triangles that use this vertex. I noticed I had calculated these lists when the station gets created for the mission, and thought that this would again be better to be precalculated, as the list never changes during runtime. So, that was the next step I did.
The code to calculate the VDup and V2t lists are as follows. This is quite an old code, dating back from when I had just started my project (late 2017, early 2018), so it is not very pretty or fancy. It gets the job done, though, and especially as I now only use it at the mesh import stage, the performance does not much matter.
        int tcnt = tris.Count;
        // Generate a helper dictionary for the v2t list.
        Dictionary<int, List<int>> v2tHelp = new Dictionary<int, List<int>>();
        for (int i = 0; i < tcnt; i += 3)
        {
            List<int> lst;
            if (v2tHelp.TryGetValue(tris[i], out lst))
                lst.Add(i);
            else
                v2tHelp.Add(tris[i], new List<int> { i });
            if (v2tHelp.TryGetValue(tris[i + 1], out lst))
                lst.Add(i);
            else
                v2tHelp.Add(tris[i + 1], new List<int> { i });
            if (v2tHelp.TryGetValue(tris[i + 2], out lst))
                lst.Add(i);
            else
                v2tHelp.Add(tris[i + 2], new List<int> { i });
        }
        // Use the dictionary to create the v2t list. This list contains indices of the first triangle index in mesh.triangles
        // for all triangles that share this vertex.
        List<List<int>> VDup = new List<List<int>>();
        List<List<int>> V2t = new List<List<int>>();
        int vc = verts.Count();
        for (int i = 0; i < vc; i++)
        {
            V2t.Add(new List<int>(v2tHelp[i]));         // Make sure each vertex gets their own list!
            VDup.Add(null);                             // Add a slot into the VDup list for every vertex.
        }
        // Generate a list of duplicate vertex positions (for help in finding adjacent triangles)
        Dictionary<NormalSolver.VertexKey, List<int>> tmp = new Dictionary<NormalSolver.VertexKey, List<int>>();
        for (int i = 0; i < vc; i++)
        {
            NormalSolver.VertexKey vk = new NormalSolver.VertexKey(verts[i]);
            List<int> lst;
            if (tmp.TryGetValue(vk, out lst))
                lst.Add(i);
            else
                tmp.Add(vk, new List<int> { i });
        }
        // Use the dictionary to create the vDup list.
        foreach (List<int> lst in tmp.Values)
            for (int i = 0; i < lst.Count; i++)
                VDup[lst[i]] = lst;    // Share the same duplicate list for all the duplicates!
That NormalSolver.VertexKey is a helper class I found from http://schemingdeveloper.com,
which just makes it easy to compare two vertices, whether they have (almost) the same position.
I created code to save these lists into a resource file, and load that file back into memory when the game loads. This data turned out to be around 70 kilobytes, so not a lot of space. I then switched my Mission 1 asteroid collision handling to use the same system as the fighter ship versus station collision handling. I still had not done any work on the rear of the station, but I thought I'd work on another issue with Mission 1 first.
Pre-created asteroids
I have had an annoying issue with my collision detection code. All the other objects have mostly static meshes, so I have been able to pre-create a KDTree for their collision handling using native C code. However, I have created asteroids on-the-fly using some FFD deformer code (based on this code snippet I found on Github), so that their shapes have been quite random. This has meant that I have had to create their KDTrees on-the-fly as well, so I have had to use C# code for their collision tests. The asteroids are not very complex, so performance-wise this has not been a major issue, but it has made the code much messier. Creating the asteroids (and especially their exploded versions) on-the-fly has also slowed down the scene launch times. In addition to these issues, I would have needed to synchronize the asteroid shapes for the multiplayer missions as well.
I decided that I did not want to live with those issues any longer, instead I wanted to have some pre-created asteroid shapes which I could then just randomly choose from. I first calculated how big of a data blob I would need to store all the pre-created asteroid information (as I thought I could save some space by not having all of them as separate meshes, as they all could share at least some of the data).
If I were to have 16 different asteroid shapes and sizes, that would mean:
- UV coordinates and triangle lists would be the same for all of those. These I could get from the original mesh.
- The asteroid mesh has 342 vertices, so I would need 16*342 Vector3 values, or 16*342*3*4 = 65 664 bytes for those.
- Normals and Tangents I could recalculate after setting the vertices, while loading up the game.
- All the exploded asteroids could share UVs, triangle lists and tangents (which is not quite correct, but nobody would notice issues with tangents in an exploding mesh). Those would be 5860*2*4 + 5860*4*4 = 140 640 bytes, plus 2016*3*4 = 24 192 bytes for the shared triangle list.
- Each exploded asteroid would need their own vertex list, plus UV2s, Normals and Colors for the exploded fragment movement handling, so this would be 16*5860*(3+3+3+1)*4 = 3 750 400 bytes. That is a pretty large block of data, but if that gets loaded, handled and then freed during the loading phase of the game, it should still work fine.
I first moved all the asteroid creation data from my Asteroid class into a separate AsteroidImport class, and then just created 16 different versions from the imported mesh (which is actually just a sphere), using the already existing code. I could also pre-create the KDTrees for the native code side while creating the asteroids, as I knew the size and shape would now be final. Same thing with the exploded asteroid mesh, all the code already existed. The code that did not yet exist was the serialization and deserialization code so that I could store the data into the Resources folder in my game, and then load the data when the game is loading.
I found out that using Linq and System.Buffer.BlockCopy it was reasonably straightforward to copy a list (or array, same thing) of Vector3 (or Vector2, Vector4) elements into a byte array. I can use code like:
    System.Buffer.BlockCopy(vertexArray.SelectMany(a => new List<float> { a.x, a.y, a.z }).ToArray(), 0,
	            byteArray, byteOffset, vertexArray.Length * 3 * sizeof(float));
That code copies vertex coordinates from vertexArray into a byteArray starting at position byteOffset in the
byte array. After I had all the data in the byte array, I could then simply write it out into a resource file like this:
File.WriteAllBytes("C:\\Projects\\LineWarsVR\\LineWarsVR\\LineWars VR\\Assets\\Resources\\AsteroidData.bytes", byteArray);
Loading the data into memory was a bit more involved, as I did not want to use Linq here (as it creates a lot of garbage). Instead I created just a single vTemp array of floats, where I could read all the coordinates, and then created the Vector3 elements using a plain old for loop:
    // Load the Asteroid data
    for (int i = 0; i < ASTEROIDCOUNT; i++)
    {
        System.Buffer.BlockCopy(byteArray, VERTEXOFFSET + i * VERTEXBYTES, vTemp, 0, VERTEXBYTES);
        for (int j = 0; j < ASTEROIDVERTICES; j++)
            asteroidData.vertices[i][j] = new Vector3(vTemp[j * 3], vTemp[j * 3 + 1], vTemp[j * 3 + 2]);
    }
Pre-calculate Mission 1 Asteroid Trajectories
Now that I had 16 separate asteroid shapes, I thought it might be a good idea to also pre-calculate the asteroid trajectories for Mission 1. Until now I had used a loop that randomly generates the asteroid starting position, and then uses a capsule-capsule collision test to check that the trajectory of this newly created asteroid does not intersect with the trajectory of any already created asteroid. If the trajectories intersect, it would mean the asteroids would hit each other before hitting the station, and I did not want that to happen. I had done this trajectory calculation during the Mission 1 startup, and seemed to take a second or two, which was a bit annoying.
Random asteroid start positions and this trajectory calculation during the mission start would not work well in the multiplayer mission either, as there I need to have the exact same asteroid trajectories and start positions for both players. I am thinking of making Mission 1 multiplayer version to be a two-player co-operative mission, as that that is pretty much how it plays as a single player mission as well.
Since I needed some information about the station while pre-calculating the asteroid trajectories, I decided to handle this trajectory calculation in the Station mesh import. I also needed to add one extra data item into the precalculated asteroids, namely the maxVertex for each asteroid, which tells the index of the vertex that is furthest away from the asteroid center. I wanted to have exact collision timing, so I needed to make sure the asteroid hits the station with the vertex that is the furthest out. This below is the structure I needed for the asteroid trajectories:
    private class CollisionHelp
    {
        public Vector3 startPos;    // Starting position of the asteroid
        public Vector3 hitPos;      // Position where the asteroid hits the station
        public Quaternion hitRot;   // Starting (and ending) rotation of the asteroid
        public float hitSeconds;    // How many seconds until this asteroid hits the station
        public float radius;        // Asteroid radius (can be get from AsteroidData.vertices[asteroidIdx][AsteroidData.maxVertices[asteroidIdx]].magnitude)
        public ushort vertexIdx;    // Station vertex that is closest to this hit position (for collision effects)
        public byte section;        // Which section of the station this asteroid hits
        public byte asteroidIdx;    // Index of the pre-created asteroid (0..15)
    }
I decided to have 16 different sets of the trajectories, each containing 46 asteroids (the number of asteroids in the highest level of Mission 1). Thus, when the Mission 1 begins, I can just choose one of the 16 ready-made trajectory setups, and do not need to calculate anything when the scene launches. The size of that structure is 3*4+3*4+4*4+4+4+2+1+1 = 52 bytes, so 16 times 46 times 52 is just 38 272 bytes, so a very small amount of memory to spend to shave off a second or two from the scene launch time.
The pseudo code for calculating the asteroid trajectories works as follows:
- First, randomly get one of the 16 pre-created asteroids:
do { collisionData.asteroidIdx = (byte)Random.Range(0, Asteroid.ASTEROIDCOUNT); -
Then, get a rotation that points the furthest out vertex towards the world Z direction:
// Calculate rotation needed to point the farthest out vertex of the astroid toward the world Z axis Vector3 maxVector = Asteroid.asteroidData.vertices[collisionData.asteroidIdx][Asteroid.asteroidData.maxVertexIdx[collisionData.asteroidIdx]]; collisionData.radius = maxVector.magnitude; Quaternion rot = Quaternion.Inverse(Quaternion.LookRotation(maxVector)); - Randomly choose a section of the station that this asteroid hits. Very large asteroids can only hit the outside parts of the station, and so on.
- Select a random number of seconds (including fractions) before this asteroid hits the station. This determines the asteroid speed.
-
Randomly select the rotation around the station (0..360 degrees around the world Z axis) where we want to hit the station at.
Quaternion dirRot = Quaternion.Euler(0f, 0f, Random.value * 360f); // Asteroid starting position around the world Z axis of the starbase -
Calculate the hit position, starting position and rotation of the asteroid, so that it hits the selected position
with the furthest vertex of the asteroid. There is a switch in the code for this, depending on which section
was selected above. For example, to hit the habitation ring outer rim (which has a radius of 139 meters), the code
would be as follows:
case Game1Scene.RING_OUTSIDE_SECTION: // Starbase outer rim, end position along the rim outer edge (x=139 + radius, y=0; z=+/- 8), rotated around z collisionData.hitPos = dirRot * new Vector3(139f + collisionData.radius, 0f, Random.Range(-8f, 8f)); collisionData.startPos = dirRot * new Vector3(Random.Range(200f, Game1Scene.MAX_DIST) + collisionData.radius, 0f, Random.Range(-200f, 200f)); collisionData.hitRot = Quaternion.LookRotation(-collisionData.hitPos) * rot; break; -
Do the above again if the trajectory of this asteroid intersects the trajectory of an existing asteroid. If not, add the data to the
list of suitable asteroids.
    } while (collisionList.Any(a => CapsuleCapsuleCollision(collisionData, a)));
    collisionList.Add(collisionData);
    /// <summary>
    /// From https://books.google.fi/books?q=collision detection capsule vs capsule
    /// </summary>
    /// <param name="c1">Capsule 1 data</param>
    /// <param name="c2">Capsule 2 data</param>
    /// <returns>True if the capsules intersect</returns>
    private static bool CapsuleCapsuleCollision(CollisionHelp c1, CollisionHelp c2)
    {
        Vector3 d1, d2;
        if (c1.hitSeconds < c2.hitSeconds)
        {
            // c1 is faster than c2, so ignore all c2 positions after c1 has already hit the base.
            d1 = c1.hitPos - c1.startPos;
            d2 = (c2.hitPos - c2.startPos) * (c1.hitSeconds / c2.hitSeconds);
        }
        else
        {
            // c2 is faster than c1, so ignore all c1 positions after c2 has already hit the base.
            d1 = (c1.hitPos - c1.startPos) * (c2.hitSeconds / c1.hitSeconds);
            d2 = c2.hitPos - c2.startPos;
        }
        Vector3 r = c1.startPos - c2.startPos;
        float a = d1.sqrMagnitude;
        float e = d2.sqrMagnitude;
        float f = Vector3.Dot(d2, r);
        float c = Vector3.Dot(d1, r);
        float b = Vector3.Dot(d1, d2);
        float s;
        float denom = a * e - b * b;    // Always non-negative
        if (denom != 0.0f)
            s = Mathf.Clamp((b * f - c * e) / denom, 0.0f, 1.0f);
        else
            s = 0.0f;
        // Compute point on L2 closest to S1(s) using
        // t = Dot((P1 + D1*s) - P2,D2) / Dot(D2,D2) = (b*s + f) / e
        float t = (b * s + f) / e;
        // If t in [0,1] done. Else clamp t, recompute s for the new value
        // of t using s = Dot((P2 + D2*t) - P1,D1) / Dot(D1,D1) = (t*b - c) / a
        // and clamp s to [0,1]
        if (t < 0.0f)
        {
            t = 0.0f;
            s = Mathf.Clamp(-c / a, 0.0f, 1.0f);
        }
        else if (t > 1.0f)
        {
            t = 1.0f;
            s = Mathf.Clamp((b - c) / a, 0.0f, 1.0f);
        }
        float dist2 = ((c1.startPos + d1 * s) - (c2.startPos + d2 * t)).sqrMagnitude;
        float radius = c1.radius + c2.radius;
        return dist2 <= radius * radius;
    }
This created a nice set of 16 precalculated asteroid trajectories, which I can then choose from randomly
when the mission begins. With 16 sets, there should be enough variety that the players do not immediately
notice the starting positions not being fully random.
Separated Station and StationBack meshes
After I began thinking about how to handle the damage caused to the non-rotating part of the station, it began to look like my life would be considerably easier if the Space Station was not a single mesh with both rotating and non-rotating parts. If the rotating part was one mesh and the non-rotating part was another, I could optimize the shaders for both of those, and I could also keep the damage systems different. The only reason why I had originally opted for a single mesh was to save on draw calls, but it has started to look like I am not actually bound by the number of draw calls all that much.
It was a simple thing to separate the meshes in Cinema 4D. The front part of the station ended up having 5343 vertices and 3932 triangles, while the new stationary back part has 910 vertices and 744 triangles. Adjusting the station import code needed some more work, but most of that was just cleaning up, as I did not need to check whether the part was rotating or not any longer.
The next step was to optimize the shaders. The original station vertex shader consumed 24.5 arithmetic GPU cycles, and the fragment shader used up 8 GPU cycles. My goal was to reduce these numbers, now that I did not need to worry about separating the rotating and non-rotating parts within the shader any longer.
I managed to optimize the (rotating) station front part to spend only 22 GPU cycles in the vertex shader and 6.5 GPU cycles in the fragment shader. In the fragment shader I made some additional optimizations as well, as it has been about a year since I last worked on the station shaders. I had learned a few new tricks since that time, so I was able to use those tricks to get a cycle or two more performance out of the shaders.
  8 work registers used, 9 uniform registers used, spilling not used.

                          A       L/S     T       Bound
  Instructions Emitted:   41      22      0       A
  Shortest Path Cycles:   22      22      0       A, L/S
  Longest Path Cycles:    22      22      0       A, L/S
  3 work registers used, 1 uniform registers used, spilling not used.

                          A       L/S     T       Bound
  Instructions Emitted:   14      3       2       A
  Shortest Path Cycles:   4       3       2       A
  Longest Path Cycles:    6.5     3       2       A
The stationary back part of the station was a good target for several optimizations:
- Since the part does not move, I could get rid of all UnityObjectToWorld calculations, I could simply use the world coordinate system for everything.
- The back part of the station does not have any interesting features in the normal map, so I was able to switch from tangent-space lighting calculations to simple vertex normal-based lighting calculations.
- I was also able to simplify the shadow calculations somewhat, as all parts of the back part of the station do receive shadows. The front part of the station has only a few parts that receive shadows, so there I had to check for those parts specifically.
  7 work registers used, 8 uniform registers used, spilling not used.

                          A       L/S     T       Bound
  Instructions Emitted:   36      19      0       A
  Shortest Path Cycles:   18      19      0       L/S
  Longest Path Cycles:    18      19      0       L/S
  3 work registers used, 1 uniform registers used, spilling not used.

                          A       L/S     T       Bound
  Instructions Emitted:   9       2       2       A
  Shortest Path Cycles:   4       2       2       A
  Longest Path Cycles:    4       2       2       A
Skybox for missions 5 and 6
After separating the station front and back meshes, and using Mission 1 to test them, I had to make the same changes also to missions 5 and 6 (the other two missions where there is a space station in the scene). While doing that work, I decided to handle yet another item that has been on my TODO list for a long time, namely having proper SkyBox for these missions. These missions happen around the same space station, so they should share the SkyBox as well.
I had various other types of planets already in my other SkyBoxes, but I hadn't yet done a gas giant planet. So, I decided to experiment with that. I had done a simple gas giant for my "Snow Fall" animation project many years ago, so I imported that (along with the small icy moon) into a new scene in Cinema 4D, and began moving things around and experimenting with various positions for all the moons. I let Cinema 4D even calculate some shadows on the gas planet "surface", just to make the SkyBox a bit more interesting.
The result looks quite nice within the game, as the big gas giant fills the view when looking straight towards it.
Shattering Solar Panel
Next, I tackled yet another issue on my TODO list: Damage handling for the Station solar panels. I thought that using the same damage system with a couple of damage states as for the main armor panels might not work all that well here. The solar panels are not armored, so they should take more damage from each hit. Since the panels are quite thin, it would not make sense to have any kind of hit craters either. One possible solution would be to have alpha texture that would get holes from hits, but that would be a performance problem, and it would be difficult to handle collisions properly with a mesh that uses transparency to represent missing parts.
Instead of various damage states, I thought I would just shatter the whole panel when it gets hit. That meant I would need to have a shattered version of the solar panel mesh, so that I could then replace the undamaged solar panel with a shattered version when the panel gets hit. I would also need to code a shader that would sort of explode the separate shattered parts of the mesh outward. I did all this work in several steps.
-
The first step was to create a mesh for the shattered panel. I copied a solar panel front face (which is a single quad, sized 80 by 20 meters) in Cinema 4D, and began splitting it using the Knife tool. I made somewhat random cuts in various directions, until I thought it looked sufficiently shattered. I then triangulated the mesh (so there were no quads remaining), and made a few additional cuts and combined a few very small triangles into larger parts. The resulting mesh contained 118 vertices and 199 triangles, and looked like this:

-
Next, I needed to make a 3D mesh from this flat 2D mesh. The idea here is, that each triangle in the original mesh would become a full 1-meter deep part with 5 faces, so that I can then later on move each of these parts separately in the shader. I did this mesh generation in code, because it felt like something that would be much easier to do in code than in a 3D program. I imported the mesh into Unity, and wrote code into my MeshPostProcessor class to change the mesh during the import. This step contained several substeps:
- Move the existing mesh vertices to Z = -0.5 (from the original Z = 0).
- Create duplicate vertices at Z = 0.5 (so the panel depth becomes 1 meter).
- Create additional duplicate vertices, so we get sharp edges with separate normal directions.
- Add some UV coordinates to these vertices.
- Generate the triangle list connecting the vertices as needed.
-
Okay, now I had the mesh to work with. The next step was to figure out what data I needed in the shader that would explode that mesh. Since each separate part of the mesh should move independently, I needed each part to have a pivot point around which the part would rotate, and a vector that would give the movement of the part by time. I decided to use UV2 and UV3 coordinates of the mesh to contain this information for each vertex. I first tested by rotating the part only around the Y axis, but that made the rotation not seem very random, so I decided to go for rotation around both Y and X axis. This made the shader code more complex (read: slower), but I thought it was worth it, as the part rotation became much more random. This is how I mapped the input values for the shader into the UV2 and UV3 coordinates:
- UV2 xy-coordinates give the pivot point X and Y coordinates (Z is always 0).
- UV2 zw-coordinates give the rotation speeds around Y and X axis.
- UV3 xyz-coordinates give the part movement vector (including the movement speed).
- UV3 w-coordinate gives the part alive time, after which the part vanishes.
-
After figuring out the values I needed, it was time to calculate and include this data into the mesh during the import phase. The code below handles that part. This code is run once for each original triangle, so every vertex of each separate part uses the same values.
    // Pre-calculate the movement of the part.
    Vector3 pivot = (oldVerts[i1] + oldVerts[i2] + oldVerts[i3]) / 3f;
    float size = Mathf.Min(7f, Mathf.Max((oldVerts[i1] - pivot).magnitude, (oldVerts[i2] - pivot).magnitude, (oldVerts[i3] - pivot).magnitude));
    Vector4 pivotAng = new Vector4(pivot.x, pivot.y, Random.Range(-50f + size * size, 50f - size * size), Random.Range(-50f + size*size, 50f - size*size));
    Vector4 movement = new Vector4(pivot.x * Random.Range(0.1f, 20f - Mathf.Abs(pivot.x)),
                                   pivot.y * Random.Range(0.1f, Mathf.Sqrt(42f - Mathf.Abs(pivot.y))),
                                   Random.Range(-10f, 10f), Random.Range(0.7f, 1f));
In the code I first calculate the pivot position (which is simply the average coordinates of the original mesh vertices belonging to each triangle). Then, I also calculate the approximate size of the part. This is simply the maximum vertex distance from the pivot point, up to 7 meters. This size is used to adjust the maximum rotation speed of the part, so that smaller parts may rotate faster than the larger parts. The rotation speed is in radians, so the range -50 to 50 (or down to -1 to 1 for parts >= 7 meters) corresponds to -2865 to 2865 (or -57 to 57) degrees of rotation during the full mesh explosion time. The movement vector XYZ coordinates are calculated based on the pivot coordinates, so that the parts move mostly away from the full mesh center, and at most 10 meters along the Z axis. Finally, the lifetime of the part is a random value between 0.7 and 1 (times the full explosion time). -
Implementing the part rotation and movement handling into the shader was the step I needed to focus on next. I copied the existing StationBack.shader, and began working on the vertex shader function. I first added a _CurrentPos uniform value, which will contain the explosion time position, from 0 (all parts have their original non-shattered position and rotation) to 1 (all parts have vanished after exploding away). Then I created rotation matrices from the sin and cos values of the angle multiplied by the _CurrentPos value. These rotation matrices are then used to rotate both the vertex position and the normal around the pivot position. Since the solar panels are flat and don't have anything interesting in their normal map textures, I decided to skip the tangent-space lighting calculations and use only the surface normal for the lighting. This allowed me to skip rotating the tangent vector.
Here is the resulting vertex shader code snippet.
    //------------------------------------
    // First rotate both the vertex and the normal around the part pivot point
    //------------------------------------
    float sina, cosa, time;
    time = _CurrentPos;
    sincos(v.pivot.w * time, sina, cosa);
    float2x2 m = float2x2(cosa, -sina, sina, cosa);
    sincos(v.pivot.z * time, sina, cosa);
    float2x2 n = float2x2(cosa, -sina, sina, cosa);
    float4 pos = v.position - float4(v.pivot.xy, 0, 0);
    pos.xz = mul(m, pos.xz);
    pos.yz = mul(n, pos.yz);
    float3 normal = v.normal;
    normal.xz = mul(m, normal.xz);
    normal.yz = mul(n, normal.yz);
    //------------------------------------
    // Add the part movement vector to the vertex position
    //------------------------------------
    pos = pos + float4(v.pivot.xy, 0, 0) + float4(v.movement.xyz * time, 0);
    if (time > v.movement.w)
        pos = float4(0,0,0,0);
The rest of the vertex shader code is somewhat similar to the normal Station shader. We can skip the texture animation and tangent space handling, though. The fragment shader is rather similar to the StationBack fragment shader, except that we can skip the luminance handling, but need to test if the shattered parts are very close to camera (so they would be inside the viewer's ship), and hide them if so.
All this resulted in a shader that spends 26 arithmetic GPU cycles (for each of those 3582 vertices, so in total 93 132 GPU cycles) and 21 load/store cycles. Somewhat on the heavy side, but not terribly slower than the plain Station shader with its 22 arithmetic cycles.
  8 work registers used, 9 uniform registers used, spilling not used.

                          A       L/S     T       Bound
  Instructions Emitted:   48      21      0       A
  Shortest Path Cycles:   26      21      0       A
  Longest Path Cycles:    26      21      0       A
The fragment shader is slightly slower than the normal StationBack shader. The solar panels do not have
any parts emitting light, so we can skip that calculation in the shader. However, we need to protect against
any of the shattered parts showing up inside the viewer's ship, and that check takes an extra GPU cycle.
  3 work registers used, 1 uniform registers used, spilling not used.

                          A       L/S     T       Bound
  Instructions Emitted:   10      3       2       A
  Shortest Path Cycles:   1       1       0       A, L/S
  Longest Path Cycles:    4.5     3       2       A
Here below is an animated GIF illustrating the shattering solar panel. Note that the _CurrentPos variable
is faked here using sin(_Time.y), so the movement of the parts slow down near the end, which they don't
do when using the proper time value. This slowing down effect would work nicely in an atmosphere, though.
Asteroid Shadows on the Station in Mission 1
While working on the solar panel shattering and testing that in the Mission 1, I suddenly noticed an obvious omission in my shadow system: Asteroids in front of the station do not show a shadow on the station! This looked weird, because the asteroids behind the station do get shadows from the station! I had earlier decided against having shadows on the station surface, because the station fragment shader was rather complex. However, now that I had separated the back part of the station, and managed to make the shaders faster, perhaps it would be a good idea to experiment with some additional shadows?
In my Shield shader I had used a Matrix4x4 uniform matrix to send data about four different shield hits to the shader, so I thought I might do something similar here, but instead send shadow info from four different asteroids. That meant that I would need to limit the number of asteroids that would simultaneously cause shadows on the station to at most four. This should not be much of a problem, as many of the asteroids hit the rear of the station, or the outer rim of the habitation ring. Only a few hit the front, and if I improve my asteroid trajectory generation to take this into account, I should be able to create trajectories that never have more than four asteroids between the station and the sun at any one time.
Okay, so the first step was to experiment with the shader, to get some dynamic shadows on the station. My asteroids are mostly spherical, so I thought having circular shadows would suffice. It would be nice to have shadows that more closely follow the real asteroid shape, but that would be very difficult to achieve with just code. The basic algorithm is quite simple (I use the world coordinate system for all these calculations):
-
Project the asteroid position along the (opposite) sun direction vector onto a plane that has its
normal aligned along the Z axis, with the plane Z coordinate at the fragment Z coordinate.
Projection of a point onto a plane (in this simplified situation) is quite simple as well, with three steps:
- Calculate the distance between the Z coordinate of the asteroid and the Z coordinate of the fragment/plane. Let's call this variable d.
- Calculate a value that tells us how far we need to follow the sun ray from the asteroid to hit the plane. Using the distance calculated above, this value t can be calculated as d / -sunDirection.z, where sunDirection gives the direction of the sun.
- Then just follow the ray to get the hitPos, which is at the coordinates asteroidPosition + t * -sunDirection. We know the Z coordinate of this hit position is the same as the fragment/plane Z coordinate, so we are only interested in the X and Y coordinates.
- Calculate the distance from the fragment X and Y position to this projected point X and Y position. We can use squared distances, as we only need this for conditional checks. The two-dimensional distance (squared) is x2+y2, which is the same as a dot product of the vector with itself. Dot product is one of the fastest operations on a GPU, so it is always good to use that when possible.
- If the distance is less than the radius of the asteroid, the fragment is in shadow.
The resulting shader subroutine for calculating the shadows of four asteroids (with their coordinates in the _Asteroids[0] .. _Asteroids[3] xyz elements, and the asteroid radius squared in the w elements) is as follows:
    inline float CheckAsteroidShadows(float3 pos)
    {
        // d = 4 asteroid distances to Z plane at fragment Z coordinate
        float4 d = pos.zzzz - float4(_Asteroids[0].z, _Asteroids[1].z, _Asteroids[2].z, _Asteroids[3].z);
        // t = how far to follow the Sun ray from the asteroid towards the station to hit the plane
        float4 t = d / -_WorldSpaceLightPos0.zzzz;
        // hitPos = xy distances from the shadow hit position to the fragment position for asteroids 0 and 1
        float4 hitPos = float4(_Asteroids[0].xy, _Asteroids[1].xy) + t.xxyy * -_WorldSpaceLightPos0.xyxy - pos.xyxy;
        // t.xy = squared distances from hitPos to fragment position for asteroids 0 and 1
        t.xy = float2(dot(hitPos.xy, hitPos.xy), dot(hitPos.zw, hitPos.zw));
        // hitPos = xy distances from the shadow hit position to the fragment position for asteroids 2 and 3
        hitPos = float4(_Asteroids[2].xy, _Asteroids[3].xy) + t.zzww * -_WorldSpaceLightPos0.xyxy - pos.xyxy;
        // t.zw = squared distances from hitPos to fragment position for asteroids 2 and 3
        t.zw = float2(dot(hitPos.xy, hitPos.xy), dot(hitPos.zw, hitPos.zw));
        // Here the radius (_Asteroids[0].w etc) needs to be the full shadow radius, so that
        // (t.x - _Asteroids[0].w) * _AsteroidPenumbras.x == 1 at the shadow penumbra outer rim, and == 0 at the penumbra inner rim.
        t = float4(t.x - _Asteroids[0].w, t.y - _Asteroids[1].w, t.z - _Asteroids[2].w, t.w - _Asteroids[3].w);
        t *= _AsteroidPenumbras; // Calculate the shadow penumbra
        t = clamp(t, float4(0,0,0,0), float4(1,1,1,1));
        return t.x * t.y * t.z * t.w; // Combine the shadows from all 4 asteroids
    }
You may notice a uniform variable _AsteroidPenumbras in the code above, which I did not explain yet.
After I got the basic system working, I noticed it did not look very good when a small asteroid very far away
from the station gave a very sharp-edged shadow on the station. This would mean the sun would be a small point
light source, which is not very realistic. I can get by with sharp shadow edges when the object that causes a
shadow is only a few meters away from the shadow receiver, but if the object is a kilometer or more away, that
looked silly. Thus, I began experimenting with having some shadow penumbras
in my shadow system.
Since my code so far worked by comparing the fragment distance to the shadow center distance, I thought that I could improve this test and create an artificial penumbra simply by checking if the distance is within certain limits, like if the distance is greater than the asteroid radius, the lighting would be one (no shadow), if the distance is less than half the asteroid radius, the lighting would be zero (full shadow), and the values between would have a gradual darkening towards the shadow center. I just had to clamp the distance values to a range 0 .. 1. The first tests were already quite promising, so I tinkered further with this idea.
To get good looking penumbras, I needed them to depend on the distance of the asteroid to the station (or actually to the hit position). I also needed to adjust the asteroid radius so that the penumbra outer edge (where the resulting lighting value should be one) will stay at the asteroid radius distance, but the penumbra inner edge will change according to distance. Thus, I needed to adjust the radius value I send to the shader along with the penumbra multiplier to get these two points to match. The resulting C# code that sends these values to the shader is as follows:
    // Calculate penumbra width (in meters) depending on the asteroid distance from the station.
    float penumbra = Mathf.Max(0.001f, (hitPos - tr.position.z) * 10f/1000f);
    // Send the asteroid position, and the radius minus the penumbra width (inner radius)
    if (penumbra > radius)
        penumbra = -((radius - penumbra) * (radius - penumbra));
    else
        penumbra = (radius - penumbra) * (radius - penumbra);
    asteroidMatrix.SetRow(asteroidMatrixRow, new Vector4(tr.position.x, tr.position.y, tr.position.z, penumbra));
    // Send the penumbra multiplier
    asteroidPenumbra[asteroidMatrixRow++] = 1f / (radius * radius - penumbra);
My apologies for reusing the penumbra variable in the above code snippet for two different things. I first
calculate the width of the penumbra (which should be at least 0.001 meters, and up to 10 meters at a distance of 1000 meters).
If the penumbra is bigger than the asteroid radius, it means no part is completely shadowed, and we need to make sure
the radius (squared) value we send will be negative for the algorithm to work. The penumbra multiplier is then calculated by
inverting the radius minus inner width of the penumbra. As all these values in the shader are squared, we need to
use them squared here as well.
Okay then, how much extra work did this new shadow code cause for the shader? I obviously need the shadows both on the rotating part of the station and on the stationary back part of the station, so I needed to make two versions of this shader as well. The more interesting is the rotating part shader, as that will be more complex. The only change to the vertex shader was the sending of the world position of the fragment as a new interpolator, so the vertex shader uses an additional load/store cycle. The fragment shader however included the whole new subroutine, and thus the arithmetic cycles went from the original 6.5 to 12. That was quite a big increase in GPU cycles, but it should still be within safe limits to keep a steady framerate.
  7 work registers used, 7 uniform registers used, spilling not used.

                          A       L/S     T       Bound
  Instructions Emitted:   25      4       2       A
  Shortest Path Cycles:   9.5     4       2       A
  Longest Path Cycles:    12      4       2       A
Here below is an animated GIF image (speeded up quite a bit) showing two asteroids approaching the station. The smaller
asteroid is pretty far, so that it only has a faint shadow in the beginning, but as it gets closer, the shadow gets darker
while the penumbra gets smaller. The larger asteroid is already pretty close when its shadow becomes visible, but even
there you can see how the shadow edge gets sharper until the asteroid hits the station. I think this works well as a visual
cue to estimate the asteroid distance from the station.
TODO List Work Done So Far
Here below is a glimpse into my TODO list. Since my TODO list is quite dynamic and I add new items and remove obsolete items all the time, instead of showing all the stuff I currently think I still need to do, I decided to show the part of my TODO list that contains the lines that I have marked as done. This list has around 70 items, while my actual TODO list still has around 190 items at this moment.
- Asteroid explosion shader - OK, may need some more work
- Cruiser bridge side windows: Ray-Plane intersection? - OK
  - https://www.cs.princeton.edu/courses/archive/fall00/cs426/lectures/raycast/sld017.htm
- Cobra cockpit shadow work - OK
- Change the cockpit instrument system, all instruments to single (radar) mesh, which contains nothing else - OK
  - Same system for Cruiser and Pirate cockpits
- Radar HUD test to use KDTree - OK
- Station needs separate KDTrees for rotating/non-rotating parts - OK
- Shield hit for exploded asteroid fragments - OK
- Camera->Sun vector for cockpit overall shadow (behind asteroid etc) - OK
- Battery level indicator to shield MFD - OK
- Mesh import code to remove hidden polygons (and vertices) from CobraCockpitInstruments - OK 27.5.2018
- HUD blue texts have dirty bottom - OK 29.5.2018
- Shooting an asteroid does not always hit - OK 22.6.2018, hitPos needs to be cleared before calling KDHit!
- Comms failure should not affect my ship laser sound - OK 25.7.2018
- Own ship should have separate audio locations for separate hit positions - OK 25.7.2018
- Damaged shields should not affect laser recharge - OK 26.7.2018
- Demo game mission failure - OK 26.7.2018
- Comms should end when the sending ship dies - OK 28.7.2018
- Shield hit audio - OK 29.7.2018
- MissionFailed text shows too long, as HUD.Update is not called after my ship dies! - OK 2.8.2018, use MyDeathMove
- Move CockpitInstrumens script from HUD to the scene - OK
- Missiles - OK 27.7.2018
- Explosion animation alpha mask is not completely transparent (19,19,19)! - OK
- Proper InControl scene change handling, separate editor controls? - OK 17.8.2018
- Cobra Cockpit Window strut bolts - OK
- Seat material - OK 20.8.2018
- Ambient occlusion emulation with seat textures - OK 21.8.2018
- Cruiser shadow work - OK 8.9.2018
- Scene class hierarchy, to collect much of the common data to the parent class - OK 16.9.2018
- Handle different cockpits in the same scene - OK 17.9.2018
- Sun color handling for cockpits - OK 18.9.2018
- Pilot throttle arm should follow throttle, not speed - OK 9.10.2018
- Change polygon order while importing the mesh (especially on cruiser bridge) - OK 13.10.2018
- Watch It replies should not have a callsign - OK 20.10.2018
- Help request replies - OK 20.10.2018
- Shooting compliment replies - OK 23.10.2018
- Damaged laser should have special sound effect when trying to shoot - OK 25.10.2018
- Congratulations and Entering Level big texts are missing - OK 25.10.2018, no Entering Level needed
- Damaged thrusters/attitude/missile should affect also player's ship - OK 25.10.2018
- Test dithering for removing banding in cockpits! - https://www.youtube.com/watch?v=RdN06E6Xn9E&t=1350s - OK 12.11.2018
- Change Laser handling to use a single LateUpdate call! - OK 13.11.2018 (called from ship movement routine)
- Laser rod color/texture/mesh - OK 10.12.2018
- Faster MovePDCBursts handling! - OK 10.12.2018
- Better handling for Object-space CameraPos, needs to take into account viewer teleporting etc - OK?
- Cruiser texturing - OK
- Cruiser damage states and textures - OK
- Radar damage and Comms damage should not cause missile/narration issues - OK 17.1.2019
- "Congratulations!" needs to override "< Missile launched! >" - OK 17.1.2019
- MyShip laser should cause double damage, to balance aiming - OK 19.1.2019
- "Controlling: Cobra 1" or "Callsign: Pirate 1" text shoud be visible in each cockpit - OK 24.1.2019
- If three or more chatter clips queued, the order may get wrong - OK 29.1.2019
- Station back side texturing - OK 5.2.2019
- Main menu should not go to subpages, rather switch canvases (for music to continue) - OK
- Recenter should work with the Oculus Go / Gear VR home button - OK
- Main menu to use a pointer - OK 19.2.2019
- Asteroid behind the station entrance but in front of the poles can not get hit by laser! - OK, needed rodLength check to t0
- PDC handling when several cruisers in the scene - OK 10.3.2019
- Own shield flash with asteroid ruble hit too bright - OK 11.3.2019, intensity to 0.5f
- Cruiser explosion mesh - OK
- Mission description bottom part - OK 29.3.2019
- Remove demo-related stuff from other code! - OK 3.5.2019
- Audible clicks and such when pointing/clicking on stuff in main menu - OK 4.7.2019
- TinyCruiser to radar - OK 8.7.2019
- TinyStation to radar on missions with a station - OK 8.7.2019
- Station VDup and v2t lists need to be precalculated! - OK 15.7.2019
- Mission 1: Adjust the difficulty, easy to start, hard to pass the last level - OK 15.7.2019
- Mission 1: Adjust asteroid start positions - OK, precalculated sets of starting positions 15.7.2019
- Mission 1: Handle new rotation speed of 15 degrees/sec - OK 15.7.2019
- Mission 1: Say "good job rookie" only once - OK, say it only on two first levels 16.7.2019
- Proper skybox for missions 5 and 6 - OK 17.7.2019
- Keep station at origin with no rotation in all scenes, for simpler shaders etc! - OK 18.7.2019
That's all for this month, thanks again for your interest in LineWars VR!
June 30th, 2019 - Still More Main Menu Work
Feedback from the Station Bridge Video
I got some feedback from the YouTube video I published along the previous blog post. One suggestion that I immediately thought was a good idea, was to change the order of the display panels. It would make more sense that the forward displays would show the play instructions on the left and the mission select on the right, so that immediately when a new player launches the game, they see the instructions. Originally the left panel contained the configuration, which I then moved to the far left. This way both the left panels contain configuration stuff, the leftmost panel has the main configuration and the rightmost the controller configuration.
I got some other feedback and suggestions as well, which I am in the process of implementing. For example, the "Self-Destruct" button should probably be red and/or have a protective cover or something to make it harder to hit it accidentally.
Fake News Show In-Game
When I was thinking about how to furnish the rear area of the space station bridge, I got an idea of having a quartet of TV screens in the middle of the back wall. This brought an idea of having a table and some benches in front of those TVs, sort of like a lounge area. I didn't want to spend time making a plush sofa or something like that (as the station bridge is supposed to be a working area), so I just made some simple benches. This table is meant for quickly eating some snacks before getting back to work.
Okay, so what sort of content could I put into those TV screens? One of them could very well show the camera inside the hangar, which would show the ships that are getting launched. I had already recorded a couple of video clips for this, so those clips would be ready to use. But what else? The first idea I got was that perhaps one of the televisions could show a news show? I could even use those animated mission videos as inserts on the news show, so I just needed a news presenter and some studio background.
I found a video clip that I thought was very suitable for my needs from Shutterstock. However, that cost $50 even in SD quality (I would not need any higher quality), and I thought that was too expensive for such a minor detail in my station bridge. I wondered if Videezy would have anything usable?
I did not find anything that would look like a news show, so my plan B was to just find some clip that would look like a news presenter talking, and some other clip that I could use as the background, and then just experiment with some layering and green-screening to combine those to a suitable short video clip.
For the news presenter I used a clip called Business woman facing the camera in a meeting via video conference. Videezy seemed to have a good collection of various background clips, so I took one called Beautiful Slide 4K Motion Background Loop. I actually did not need the full 4K versions of these clips, so I just downloaded the preview videos (the URL for those I found from the page source), which had a 630x354 pixels resolution.
I then launched up my trusty old VirtualDub/AviSynth combination, and began working on a script to combine all the required parts into a final composition. The steps I needed to do were the following:
- First, I needed to create an alpha mask for the news presenter video. I found out that Avisynth has a nifty
command ColorKeyMask for this. I just needed to get some color values from the background, and was then
able to mask most of the background away. This command masked some pixels also from the hands and face of the
presenter, though. This was not a big issue, as I only needed 32 frames for my video. I just saved each mask frame
into a separate BMP file, and then painted over the extra pixels by hand. Luckily the presenter had black hair
and jacket, so those got very easily separated from the background. The AviSynth script snippet I used for creating
the alpha mask is as follows:
a = a.ResetMask()
a = a.ColorKeyMask($989479, 12)
a = a.ColorKeyMask($A09B84, 12)
a = a.ColorKeyMask($8D896F, 12)
a = a.ColorKeyMask($818068, 12)
a = a.ColorKeyMask($9DA08F, 12)
a = a.ShowAlpha()
return a

- Next, I worked on the background clip. I added some black borders around the clip (the preview clip was
630x354 pixels, so I just made it 640x360 using the black borders). I then used the StackHorizontal
and StackVertical commands to make a 3x3 grid of the clip, so that it would look like some animation
running on a background wall TVs in a news studio. I also made it somewhat brighter. The original clip was
already looping seamlessly, but I needed to do some FPS conversion to make the loop exactly 32 frames long.
b = FFMpegSource2("Beautiful_Slide_4K_Motion_Background_Loop.mp4").ConvertToRGB32()
b = b.AddBorders(5,3,5,3)
b = StackHorizontal(b, b, b)
b = StackVertical(b, b, b)
b = b.Lanczos4Resize(960, 540)
b = b.Crop(100, 120, 640, 360)
b = b.ConvertFPS(26)
b = b.SelectEvery(2,0)
b = b.AssumeFPS(8)
b = b.Trim(0,31)
b = b.Levels(0, 1.5, 255, 50, 255)
- After that it was time to make the "NEWS" logo and the bottom banner area. I just made a BMP file containing
these, and a corresponding mask file. I could then make a 32-frame clip from these images with these commands:
n = ImageSource("NewsBottom.bmp", 0, 31, 8).ConvertToRGB32()
n = n.Mask(ImageSource("NewsBottomMask.bmp", 0, 31, 8).ConvertToRGB32())
-
For the video insert I just used the same animation I had captured from my Mission 1 and used as the
short clip on the Mission Select display panel. I am thinking of swapping this insert video randomly
during game, to make this news show look somewhat more interesting.
i = FFMpegSource2("g:\OwnVideos\2019-01-30_09-04-14.mkv").Crop(436, 112, 1048, 590) # Mission 1 footage i = i.Trim(3945, 3945+8*32).SelectEvery(8,0).ConvertToRGB32() -
The final step was then just to layer all of these together, and add a scrolling text to the bottom. I used
the Layer and Subtitle commands for these, with the subtitles animated over the 32 frames.
a = Layer(b, a.Lanczos4Resize(546, 306), "add", x=-58, y=8)
a = Layer(a, n, "add")
a = Layer(a, i.Lanczos4Resize(280, 180), "add", x=340, y=8)
s = "Rookie pilot saves a starbase from rogue asteroids!  Rookie pilot saves a starbase from rogue asteroids!  Rookie pilot"
a = a.Animate(0, 31, "Subtitle",
\	s, 8, 320, 0, 31, "Arial", 24, color_white,
\	s, -500, 320, 0, 31, "Arial", 24, color_white)
return a
Space Suit Lockers Using Impostors
Okay, now the center part of the rear wall was done, but as the rear wall is 20 meters wide in total, the four TV screens only cover a small part of the wall. What else could I have there? Well, obviously the wall should have doorways leading to the inside of the space station. After adding those doors, I had managed to cover 7 meters of the total 20 meters, so I still had 13 meters worth of wall surface to decorate. I was thinking of some emergency stuff, and got the idea of having some emergency space suits in lockers along the rear wall. Simple locker doors would not be all that interesting, but how about if the lockers would have transparent windows showing the space suits hanging inside? That might look pretty neat.
I first looked for some royalty-free space suit images, but those turned out to be difficult to find, and their lighting was never suitable for what I wanted. So, plan B was to find (or model myself) a simple space suit, and then render that to a texture. I did not want to include actual space suit meshes into my space station bridge, as the suits are pretty far (around 11 meters behind) from the player, so you would not see them properly as 3D anyways. They do never even get any sunlight either, so the lighting will stay constant. I should be able to get by with some flat imposter meshes for the space suits.
After some hunting I found a free space suit mesh from CGTrader (by hlostoops). It was not exactly like I wanted, so I did some editing and material changing to it, and got it looking pretty much what I wanted. I chose orange color for the suit, as it is meant to be an emergency survival suit after some catastrophic event has occurred in the space station (complete loss of pressure and/or major structural damage).
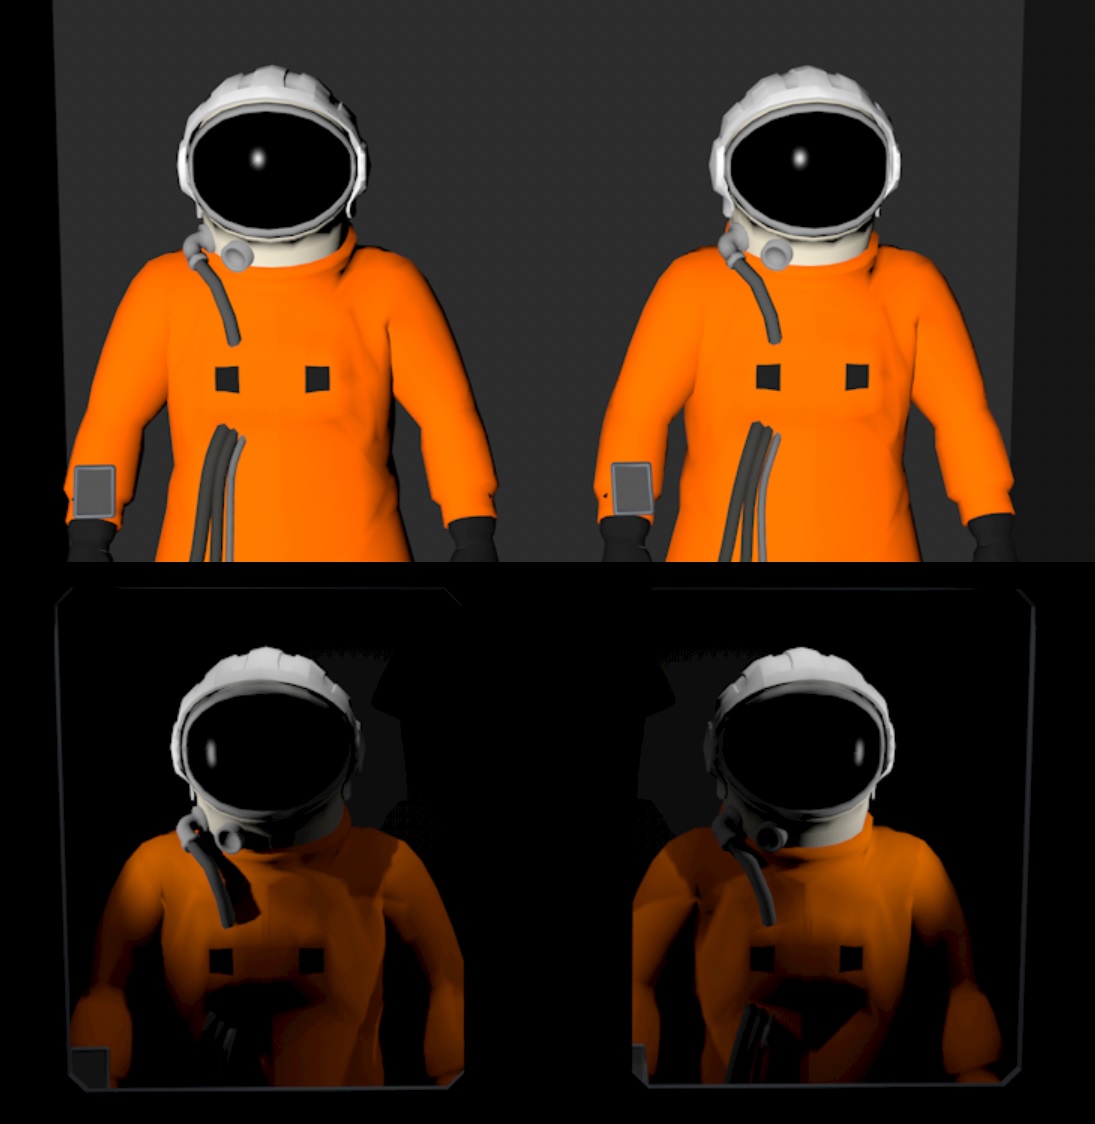
Above is an image of the suits inside the locker with just the default light and no locker doors, and below them the final image how it looks like in-game, with the locker doors in place and some lights inside the lockers shining on the suits.
I still have around 3 meters on each side that I need to decorate with something. On one side there should probably be some WC doors, on the other side there could be some sort of a small kitchen area, with a sink and a microwave oven at least. I haven't quite decided on this one yet.
I found from www.pexels.com some footage from a basketball game, so I used that as the contents of another TV screen. The top TV screens show a camera feed from the hangar deck, and a scrolling log display panel feed. Here below is an image of what the central area of the back wall now looks like when viewed from the player seat. Some global illumination and ambient lighting setup is still missing or unfinished.
All Music Received!
Just a couple of days ago I received the last remaining music tracks from Stelios Klonaridis (Agroglyph). He did very good work composing new separate music tracks for each of my 9 missions. I used his pre-existing "Epic Adventure Dubstep Trailer" track for my main menu, but all the other music is now specifically composed for LineWars VR! It is great to have at least one aspect of my game now fully done! Practically everything else still needs at least some work, though.
That's about it for this blog post, thanks again for your interest in my blog and LineWars VR!
Previous blog posts
See here for blog posts from the first half of 2019 and before.